Building a Full VPC System in AWS (With NAT, Bastion, Endpoints, and Flow Logs)
Step-by-step guide on setting up a complete AWS VPC system with public/private subnets, NAT Gateway, Bastion host, VPC Peering, Endpoints, and Flow Logs.
VPC Network Project 🏗️
In this project, we will create a fully functional, self-sufficient AWS VPC. The setup will include public and private subnets, NAT Gateway, Bastion host, VPC Peering, Endpoints, and Flow Logs sent to both CloudWatch and S3. We’ll also set up Athena to query our Flow Logs for analysis.
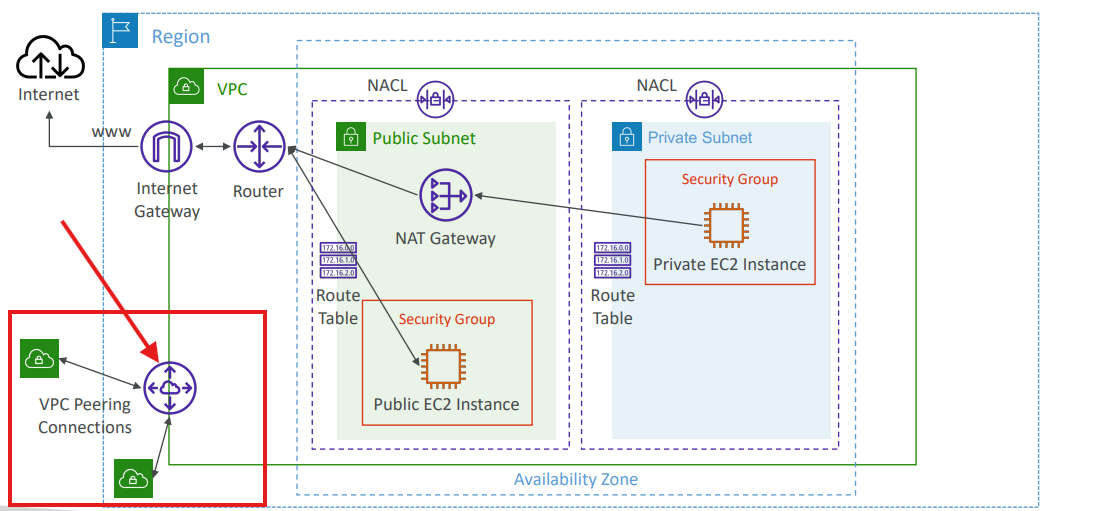
Let’s start with a VPC Components Diagram to visualize our architecture:
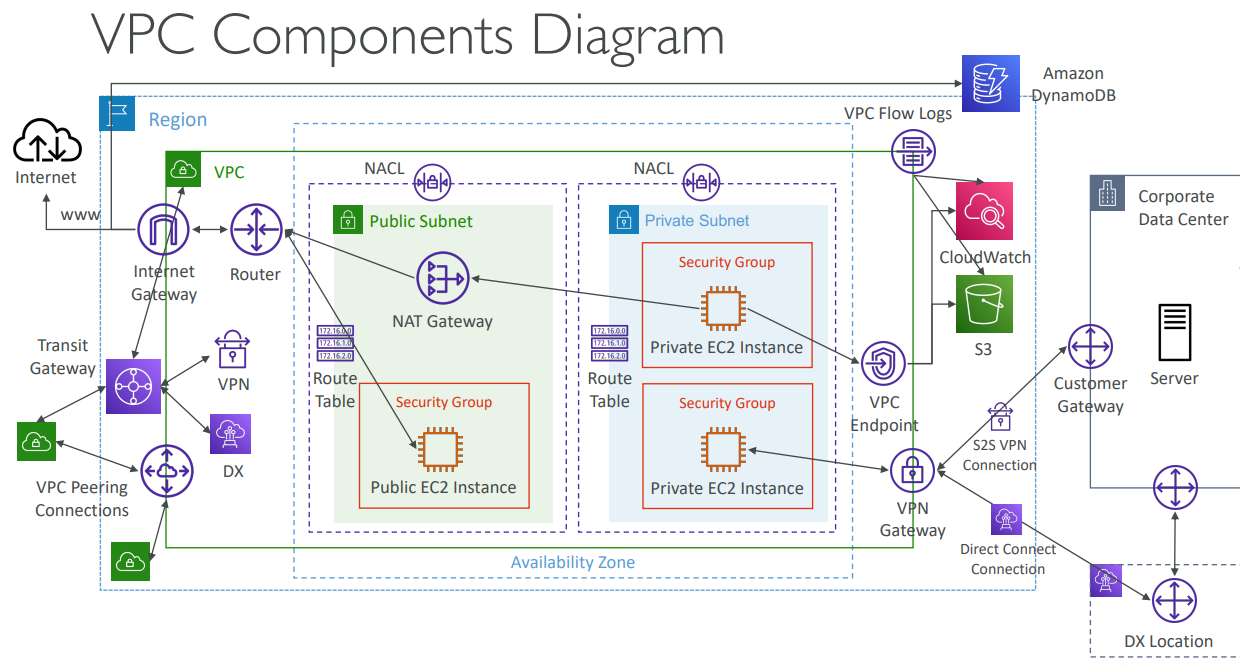
This diagram shows how all VPC components connect: Internet Gateway, NAT Gateway, Route Tables, Public/Private Subnets, EC2 Instances, VPC Peering, Endpoints, and Flow Logs.
1. Creating the VPC 🏗️
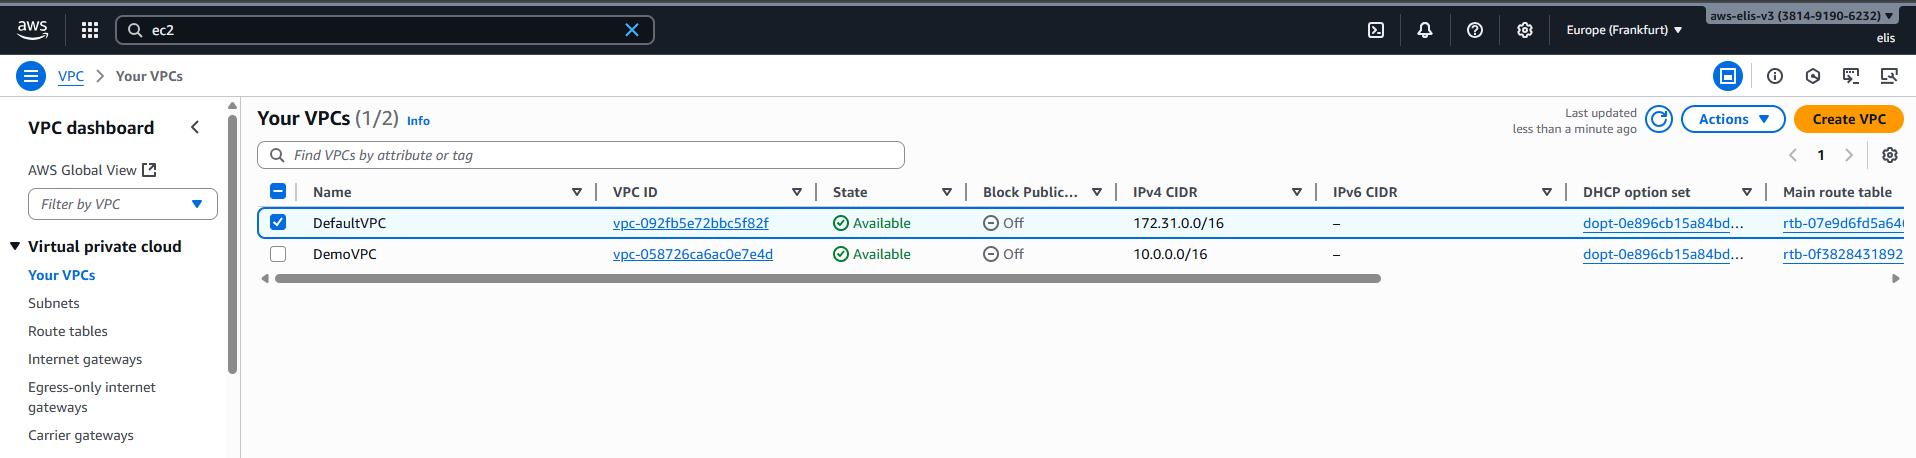
First, access the VPC creation page in the AWS Console.

After filling out the details, our VPC is created:
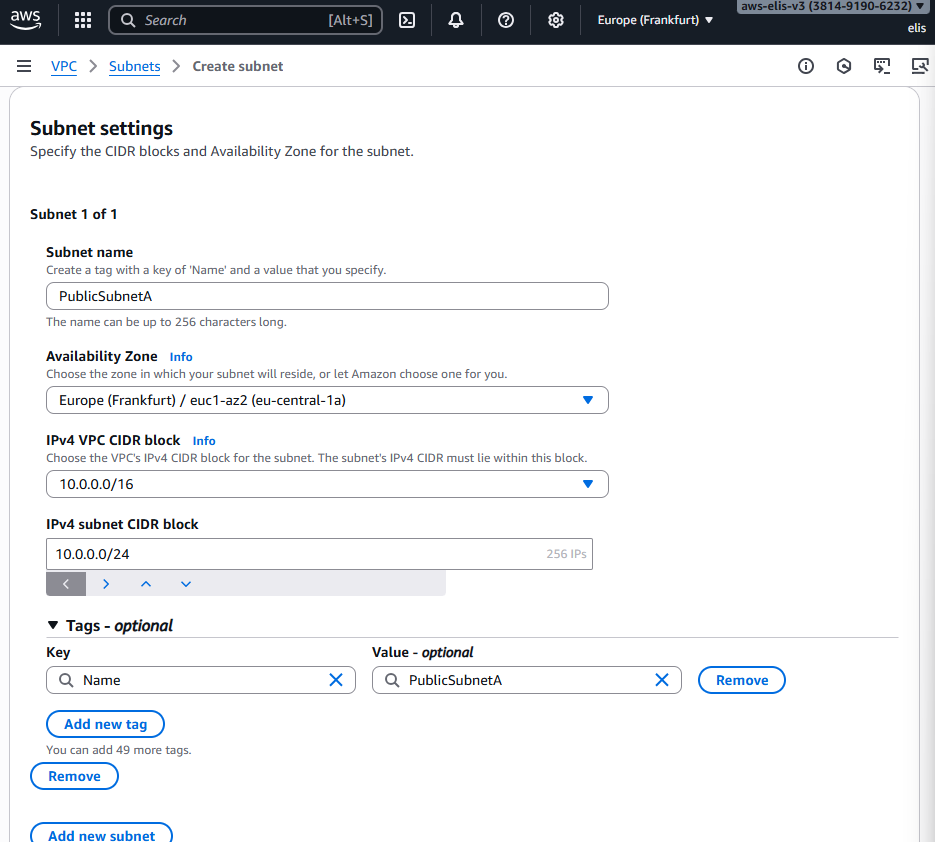
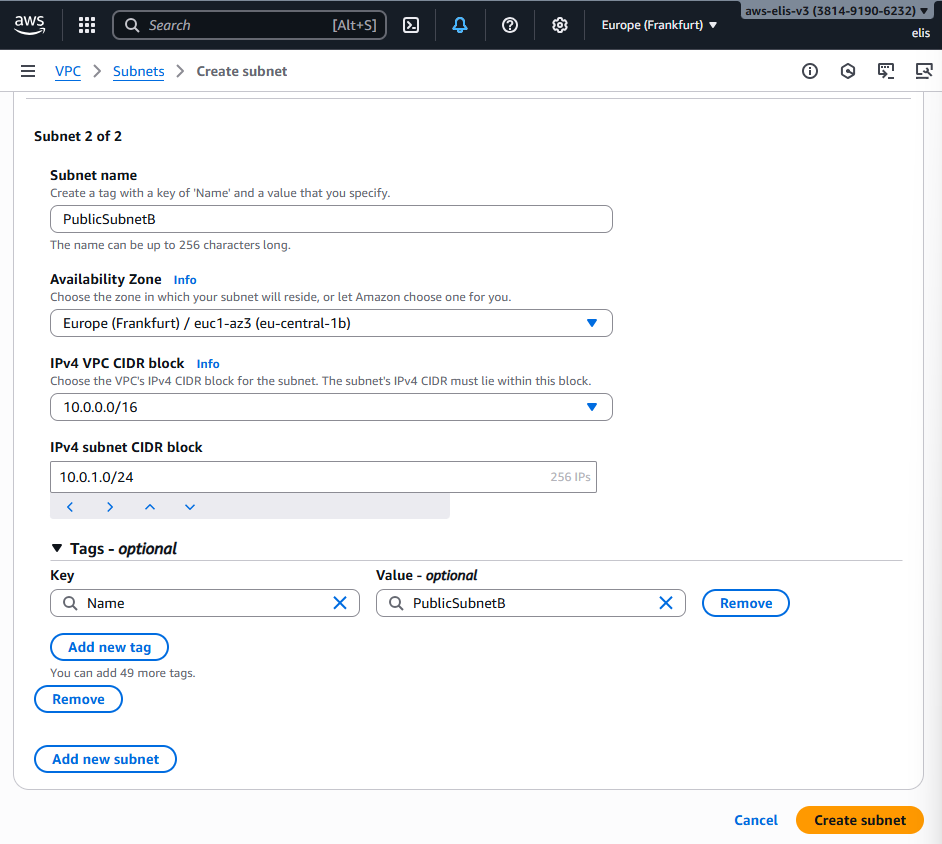
2. Creating Subnets 🌐
Public Subnet A
- Region: Europe (Frankfurt) eu-central-1a
- CIDR: 10.0.0.0/24
Public Subnet B
- Region: Europe (Frankfurt) eu-central-1b
- CIDR: 10.0.1.0/24
Private Subnet A
- Region: Europe (Frankfurt) eu-central-1a
- CIDR: 10.0.16.0/20

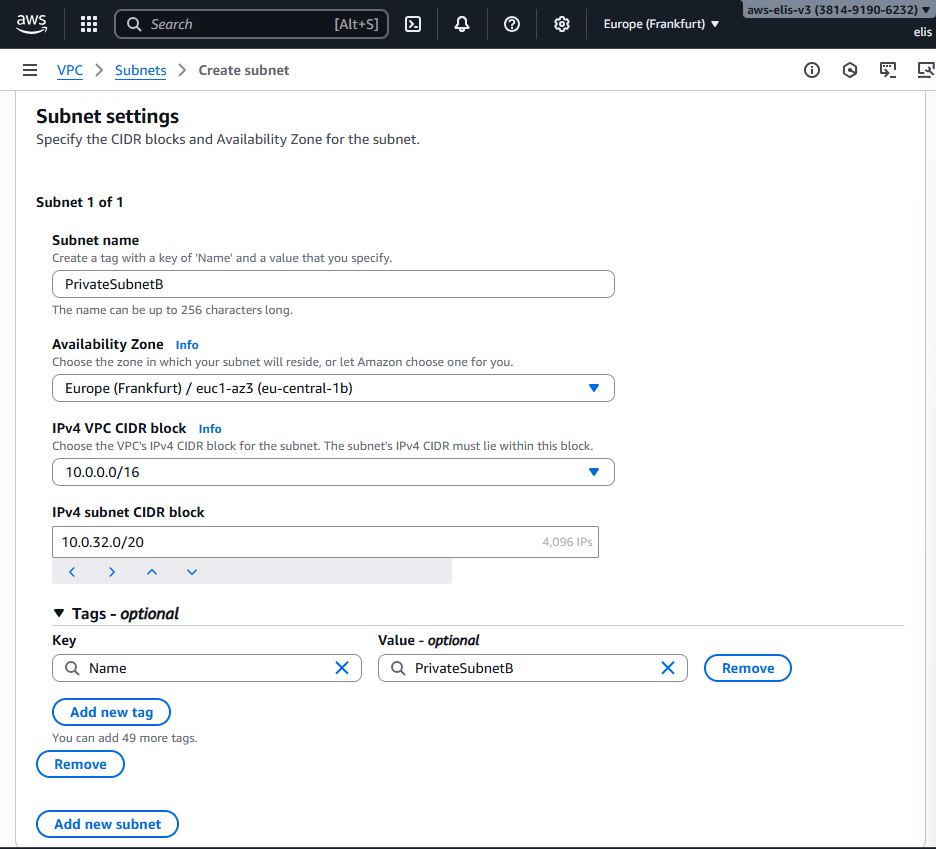
Private Subnet B
- Region: Europe (Frankfurt) eu-central-1b
- CIDR: 10.0.32.0/20
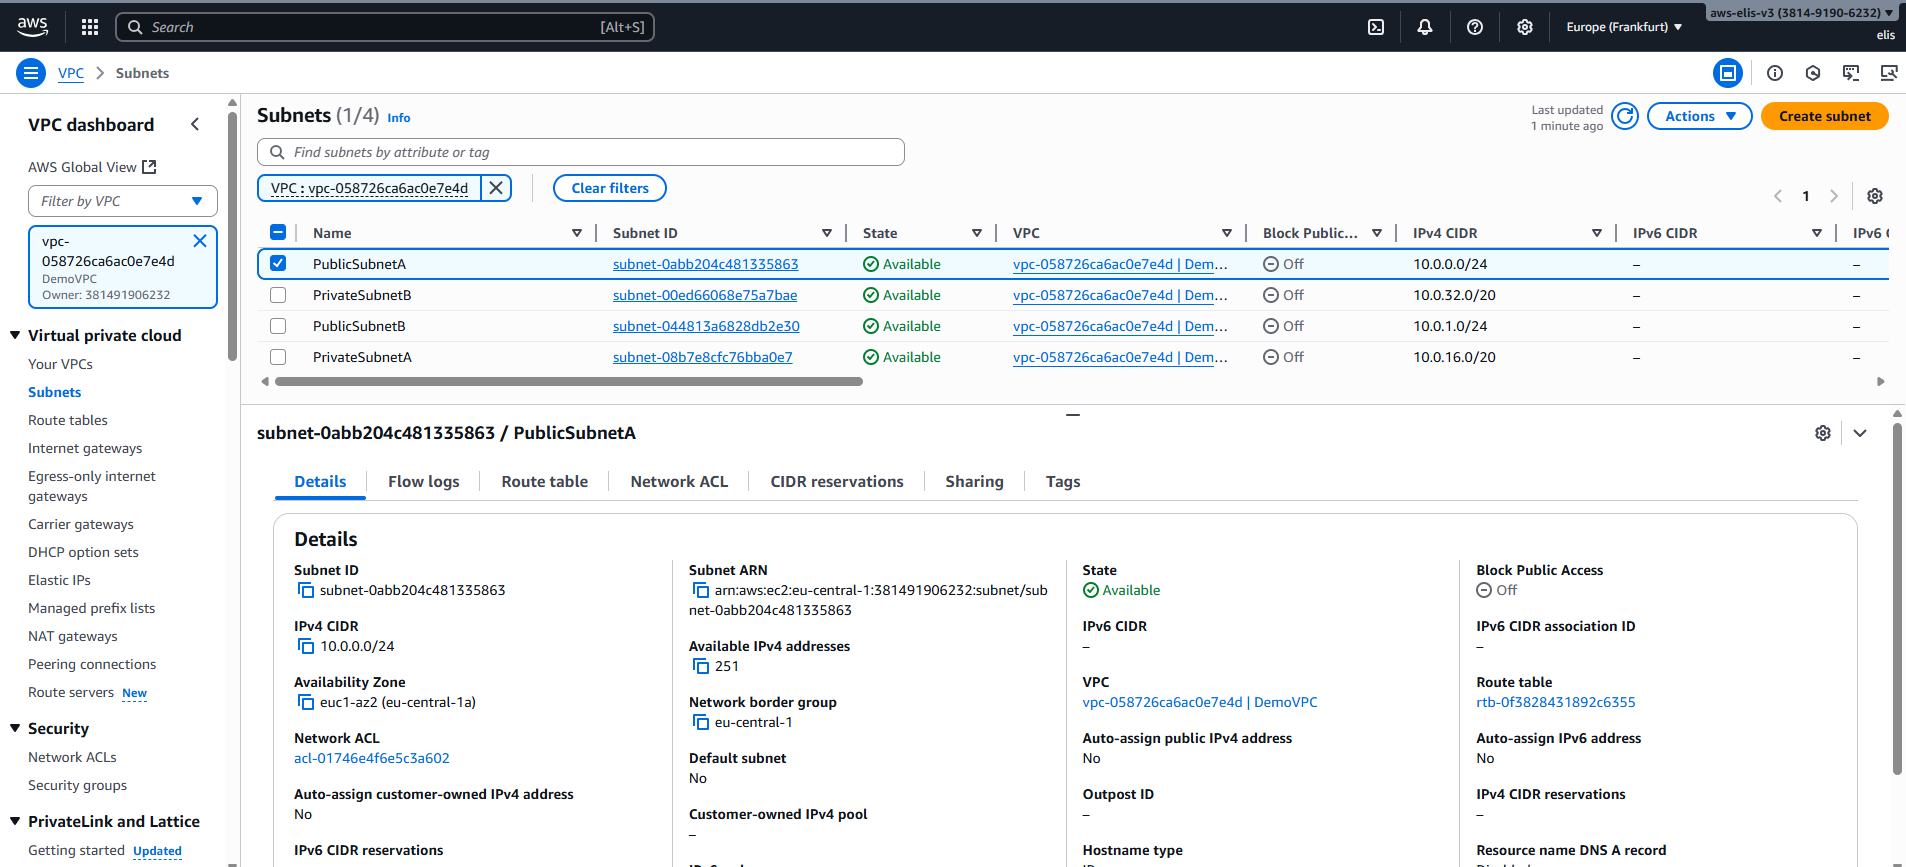
Finally, let’s see our subnets in the dashboard:
3. Launching the EC2 Instances 🚀
Before creating EC2 instances, ensure auto-assign Public IPv4 is enabled for public subnets:
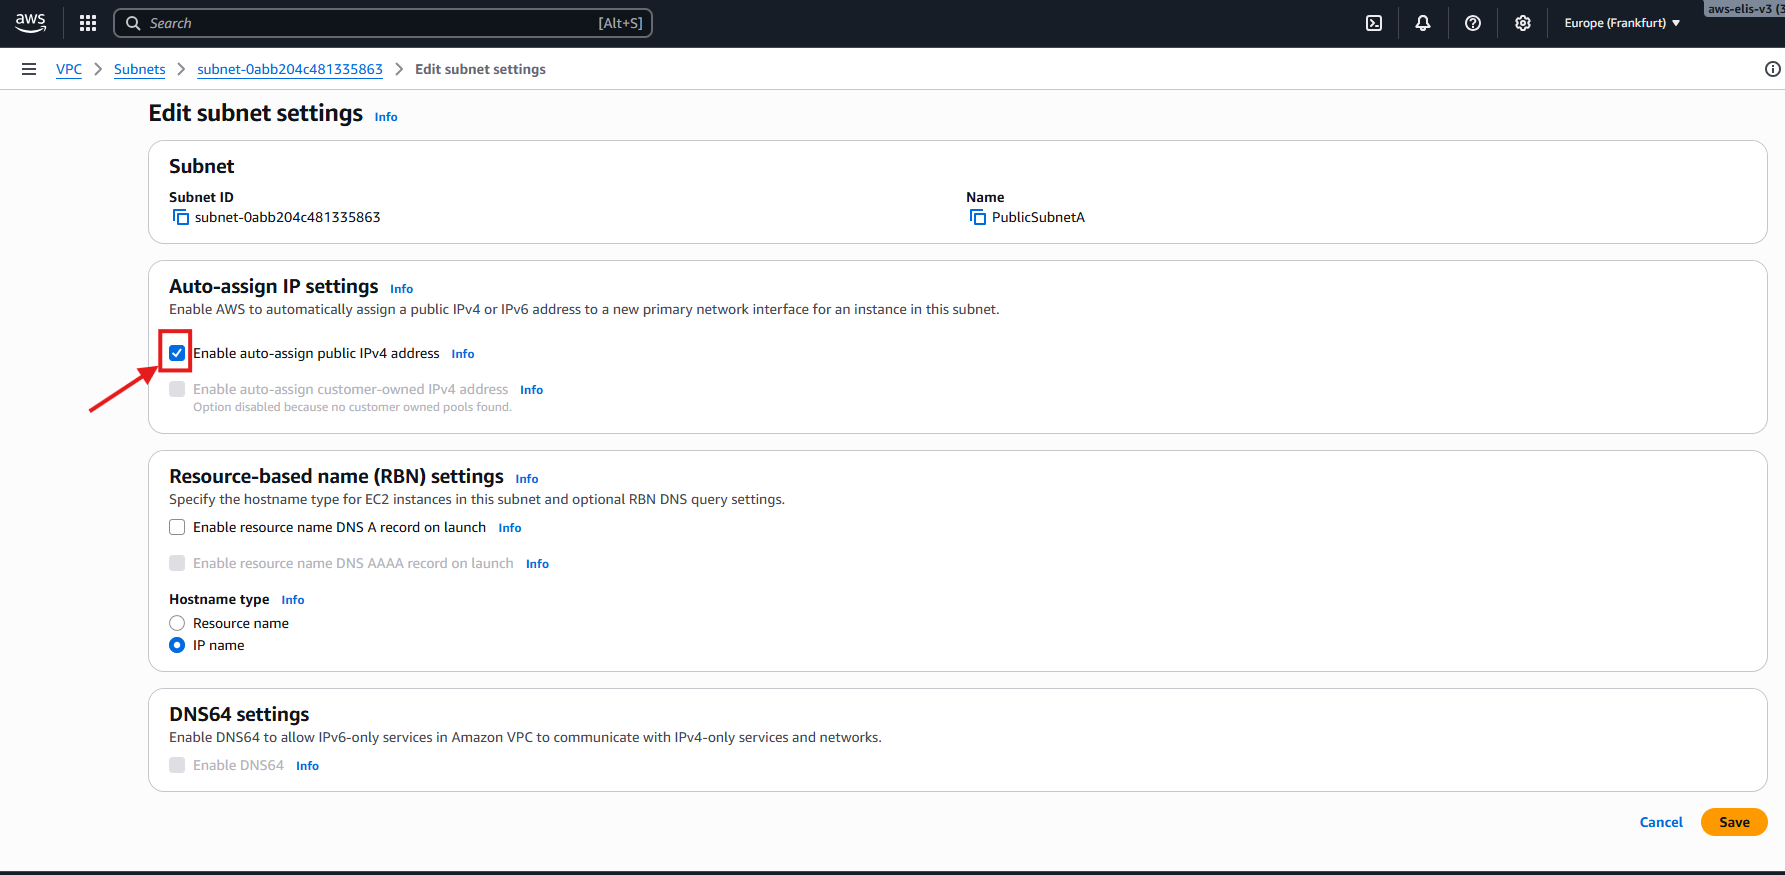
This ensures our public instances receive a public IP automatically.
For detailed info on setting up your first EC2 instance, refer to my previous guide: _posts/2025-09-10-you-first-ec2instance.md
Public EC2 Instance (Bastion Host)
- Select DemoVPC and Public Subnet A
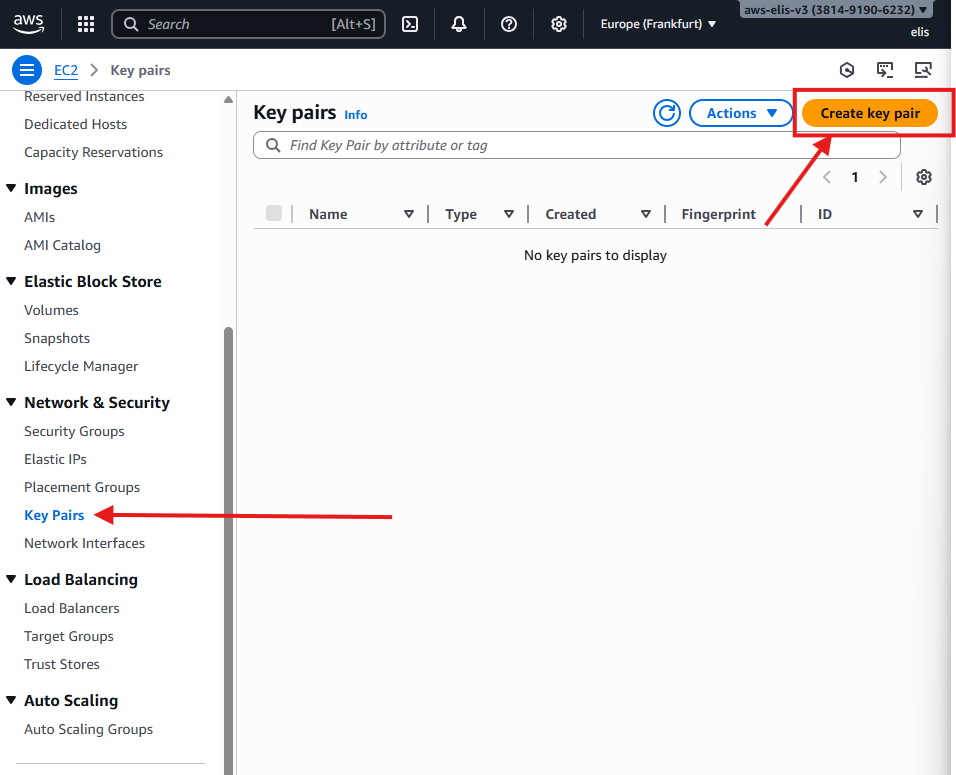
- Key Pair:
DemoKeyPair - Security Group: Allow SSH (port 22) from anywhere
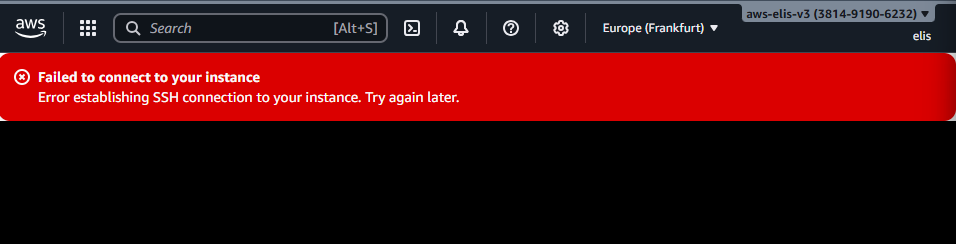
Attempting to connect before IGW setup:
1
ssh -i "DemoKeyPair.pem" ec2-user@<Public-IP-Address>
This will fail because the Internet Gateway is not attached yet:
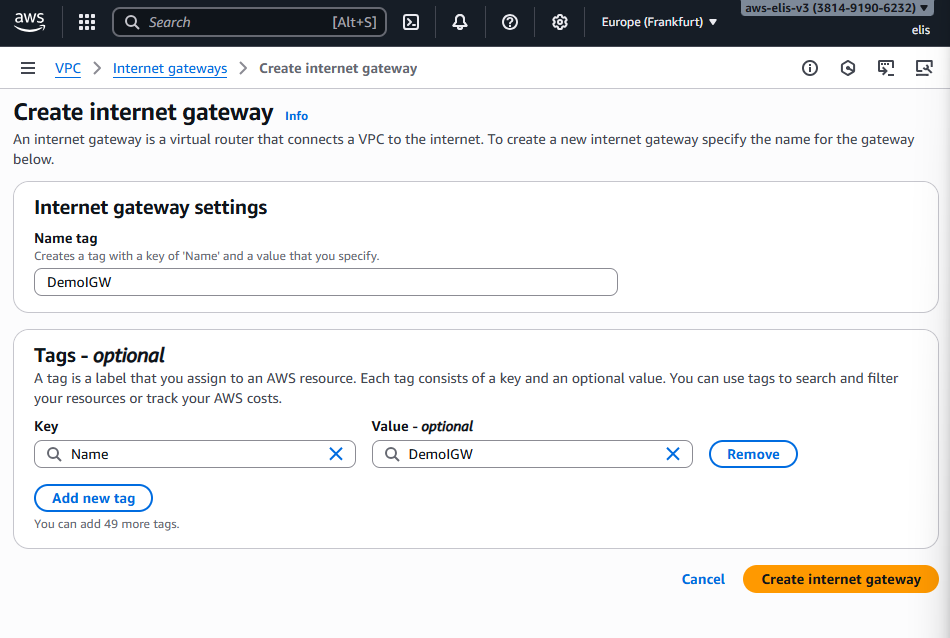
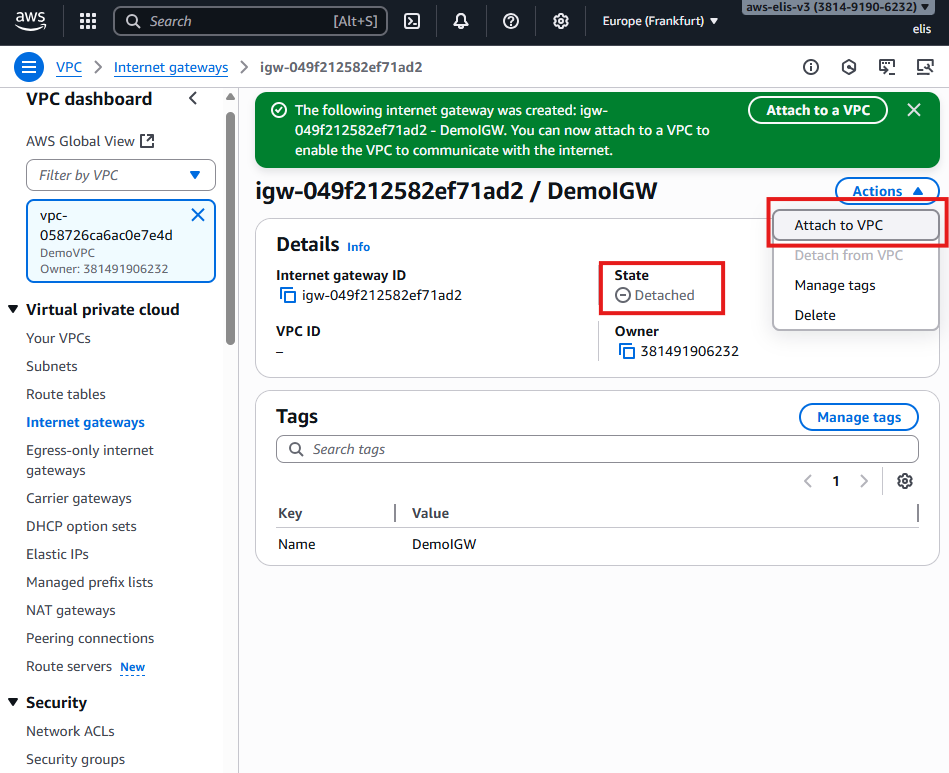
4. Setting Up Internet Gateway (IGW) 🌐
Creating the IGW
Attach it to DemoVPC:
Even now, connecting to the EC2 instance fails without proper route tables.
5. Creating Route Tables 🛣️
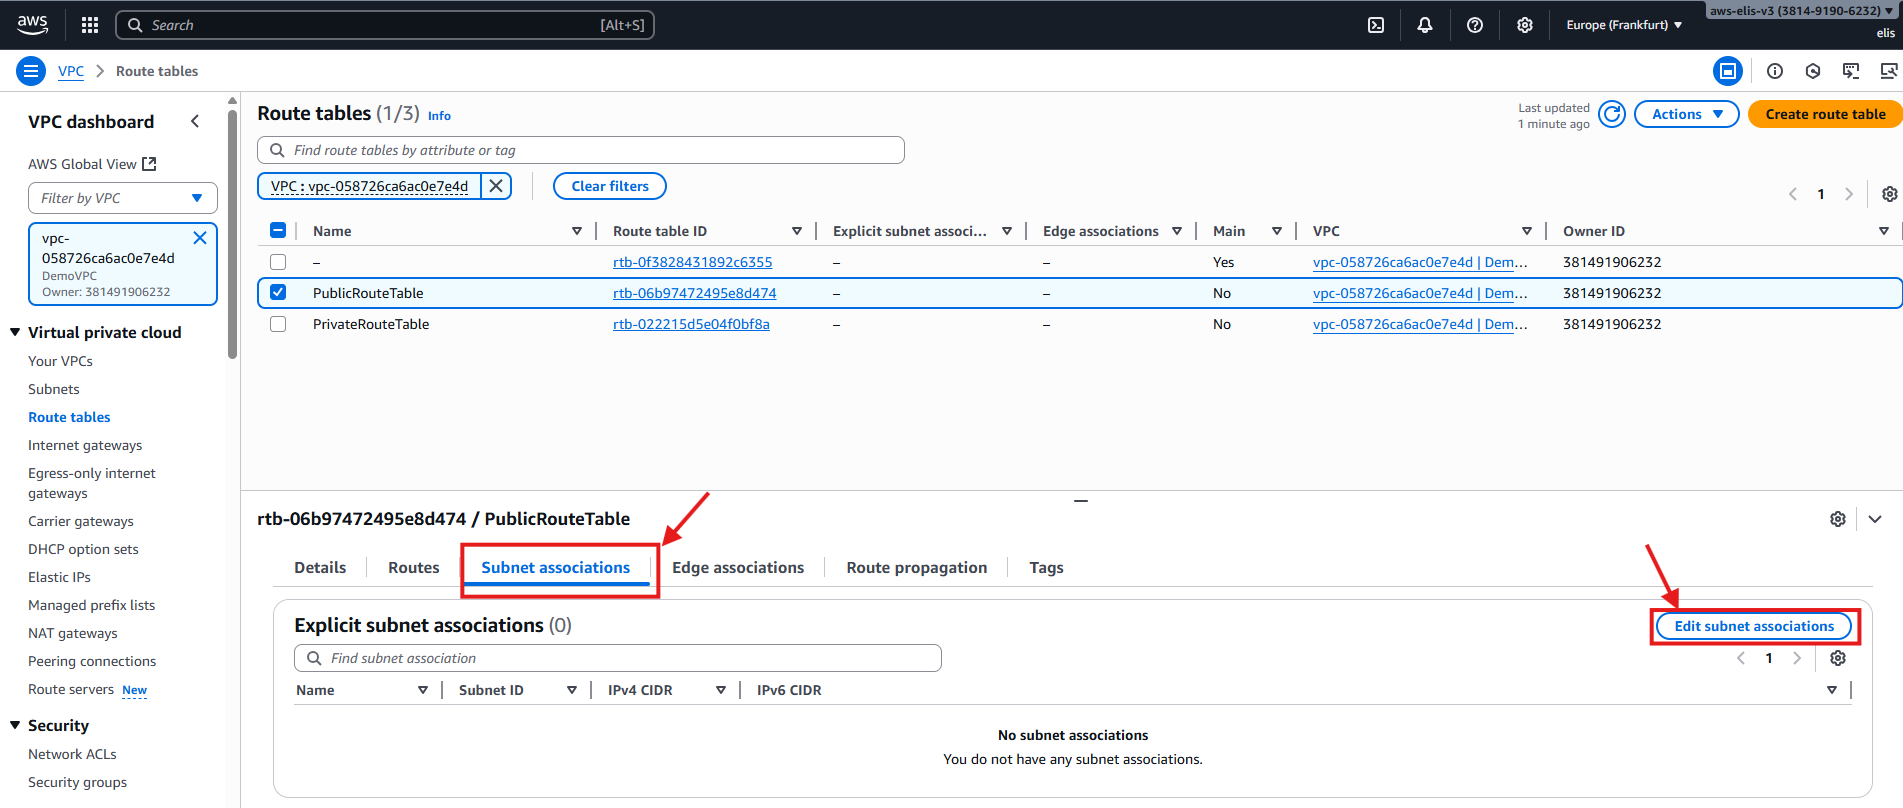
First, let’s access the Route Tables menu in the AWS VPC dashboard. By default, there is a route table, but best practice is to explicitly create route tables for each VPC.
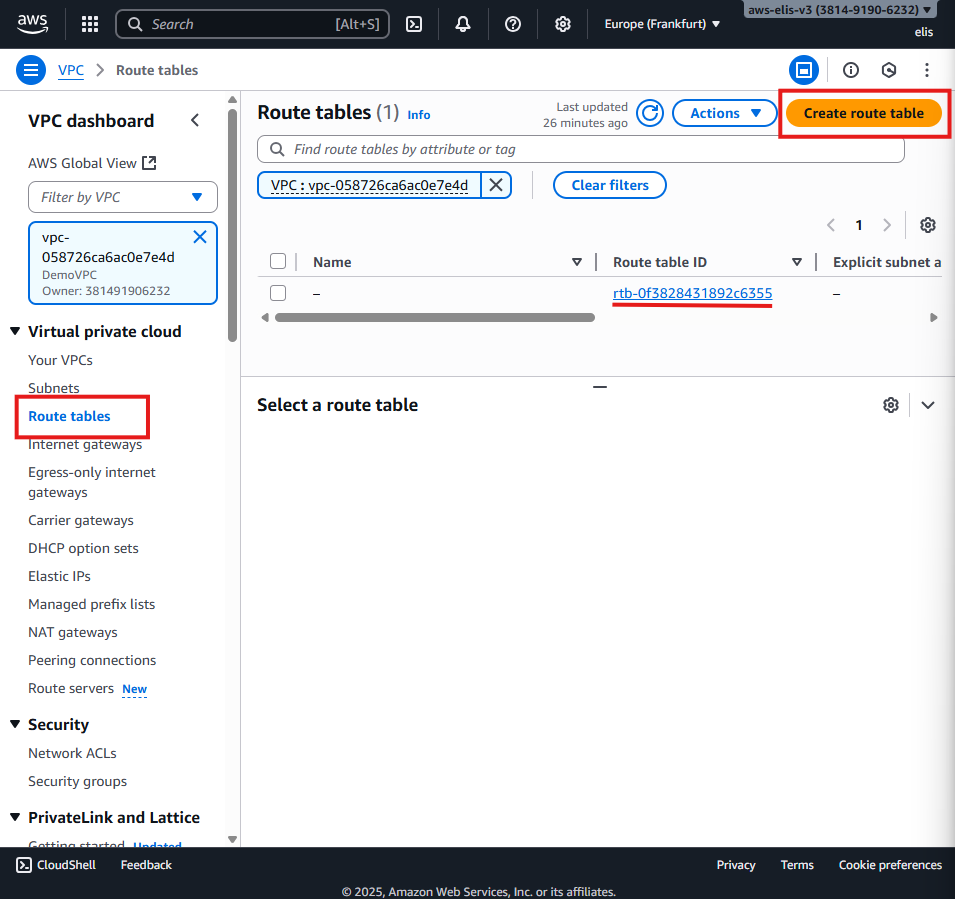
The default route table exists automatically, but we will create explicit public and private route tables for better control.
5.1 Creating Public and Private Route Tables
We start by creating a public route table and a private route table.
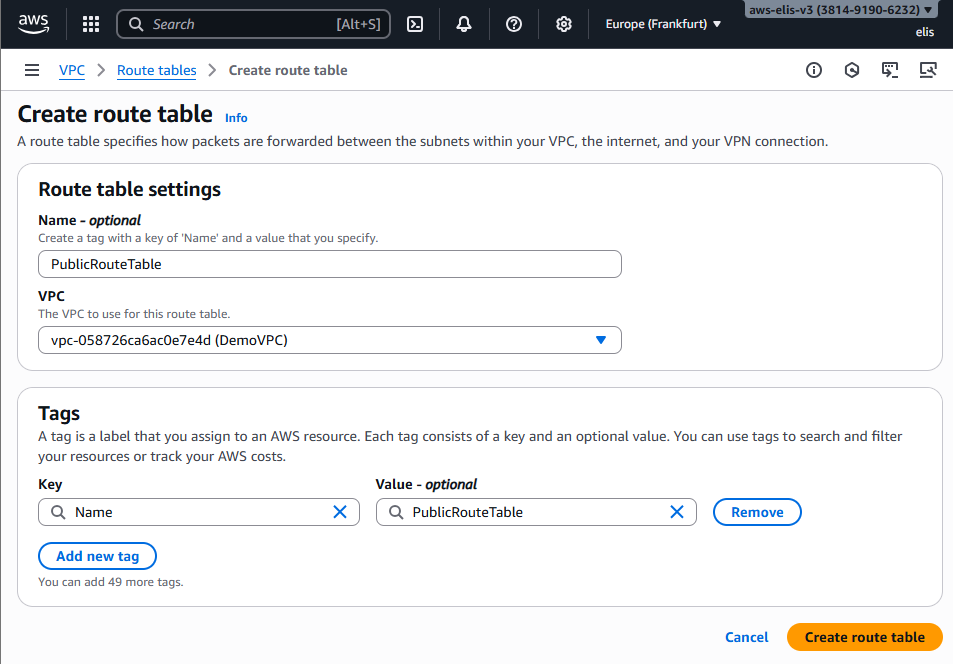
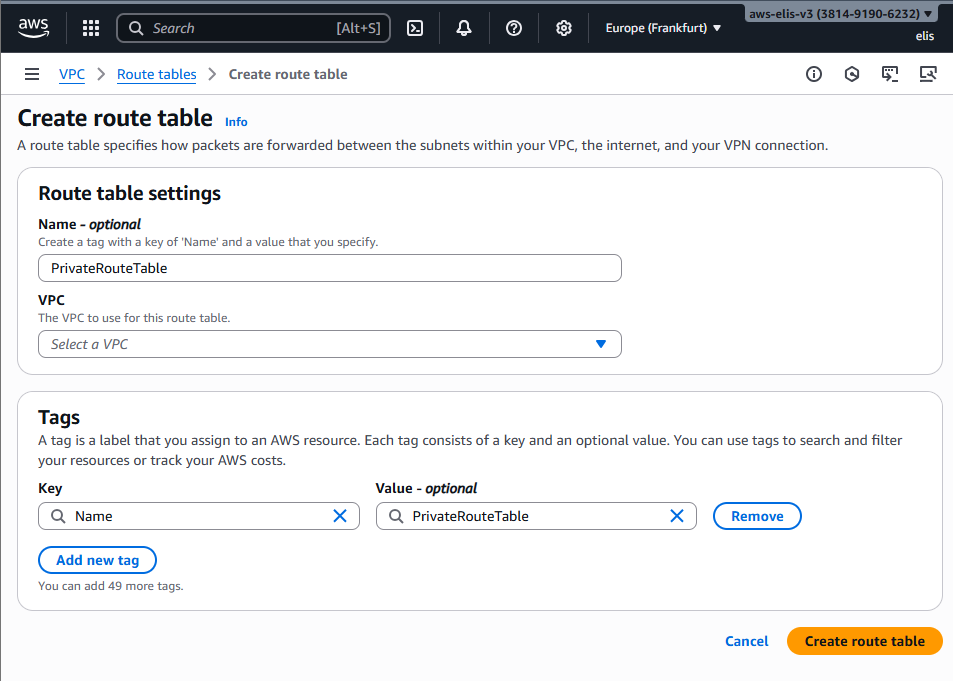
The public route table will be associated with our public subnets, and the private route table with our private subnets.
5.2 Associating Subnets
Now, let’s add subnet associations for our public route table, including Public Subnet A and Public Subnet B.
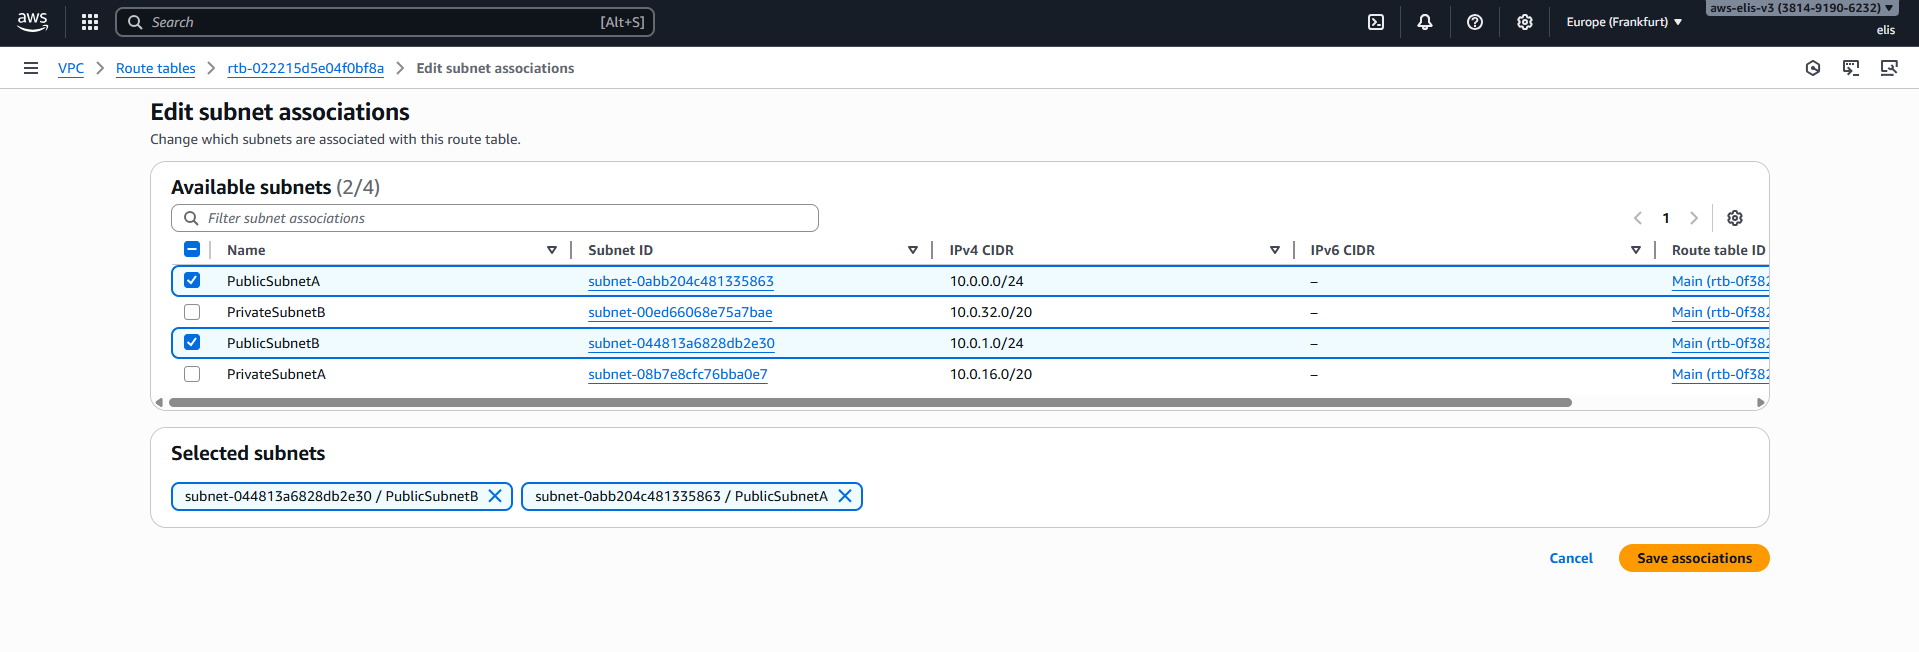
Next, we associate our private subnets with the private route table.

6. Public Route Table Rule
To allow our public subnets to connect to the internet, we need to edit the public route table and add a rule. Any traffic destined for addresses outside our VPC CIDR (10.0.0.0/16) should be routed to the Internet Gateway (IGW).

For our private route table, we leave the routes internal for now:
This setup ensures that public subnets have internet access while private subnets remain isolated until we add NAT Gateway routing.
Now we can successfully connect to our public EC2 instance:
7. Private EC2 Instance via Bastion Host 🔐
We need a Bastion Host to connect to private instances.
We will use our already created public EC2 instance as the Bastion Host.
Rename it:

Create a key pair for the private instance:
Save the
.pemfile securely. This will be used to SSH into the private instance through the Bastion Host.
Private EC2 Instance Network Settings
- VPC: DemoVPC
- Subnet: Private Subnet A
- Security Group: PrivateSG
- Inbound rules: Allow SSH only from Bastion Host security group
- Key Pair: DemoKeyPair

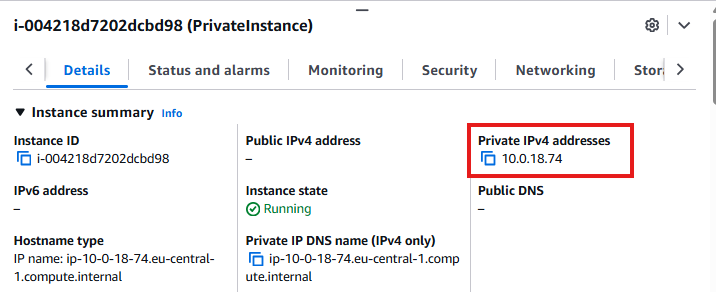
Connecting to Private EC2 via Bastion Host
- Check Private IPv4 address of the private instance:
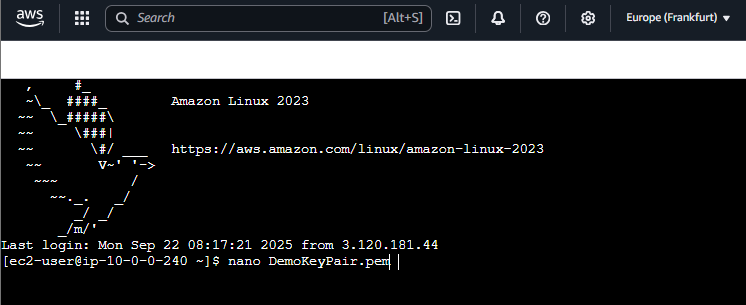
- Create
.pemfile on Bastion Host:
1
nano DemoKeyPair.pem
- Paste the contents of your private key, save, and exit (Ctrl + X, Y, Enter).
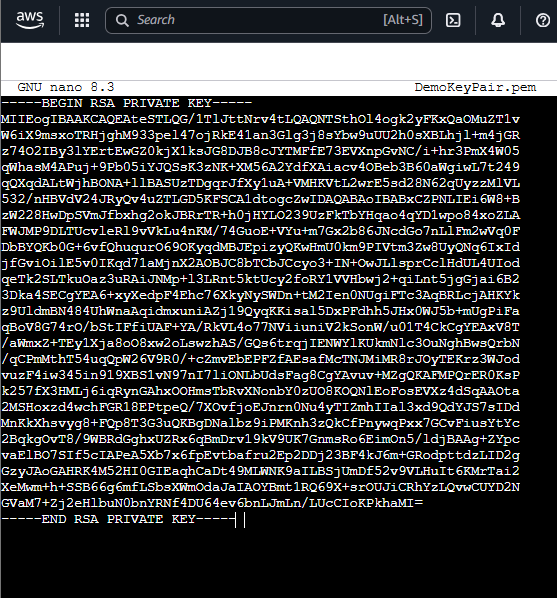
Don’t worry, this Key has already been deprecated, so it’s no longer valid 😌
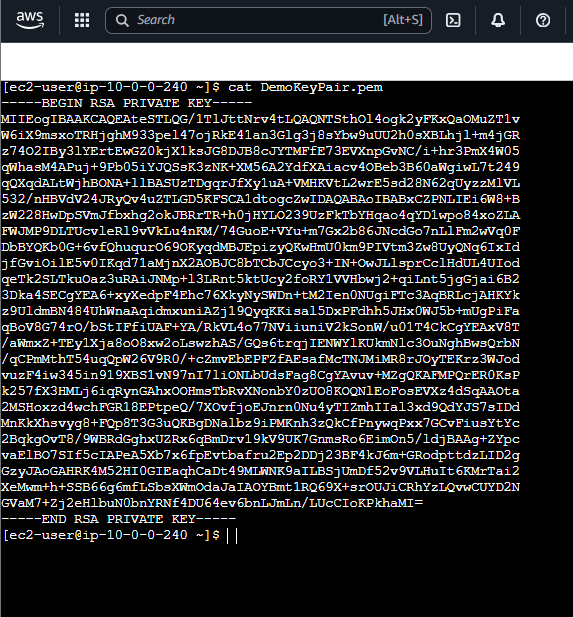
- Verify key contents:
1
cat DemoKeyPair.pem
- Set correct permissions:
1
chmod 0400 DemoKeyPair.pem

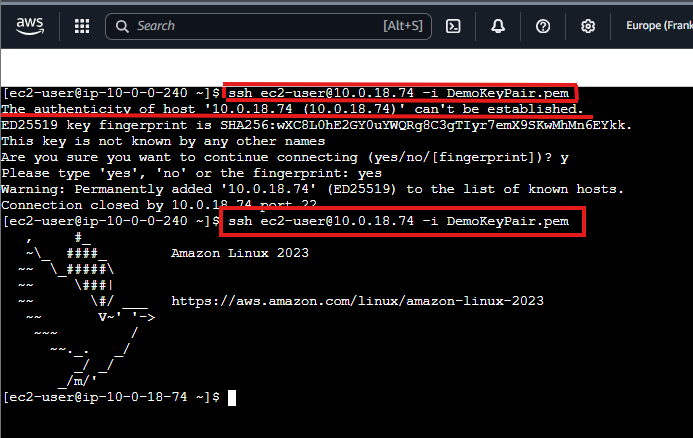
- Connect to private instance:
1
ssh -i "DemoKeyPair.pem" ec2-user@10.0.18.74
You may see:
“The authenticity of host can’t be established…”
Approve it to continue. Connection succeeds:
At this point, pinging external websites will fail until we set up NAT Gateway.
8. Setting Up NAT Gateway 🌐🛡️
NAT allows private instances to access the internet securely without exposing their IPs.
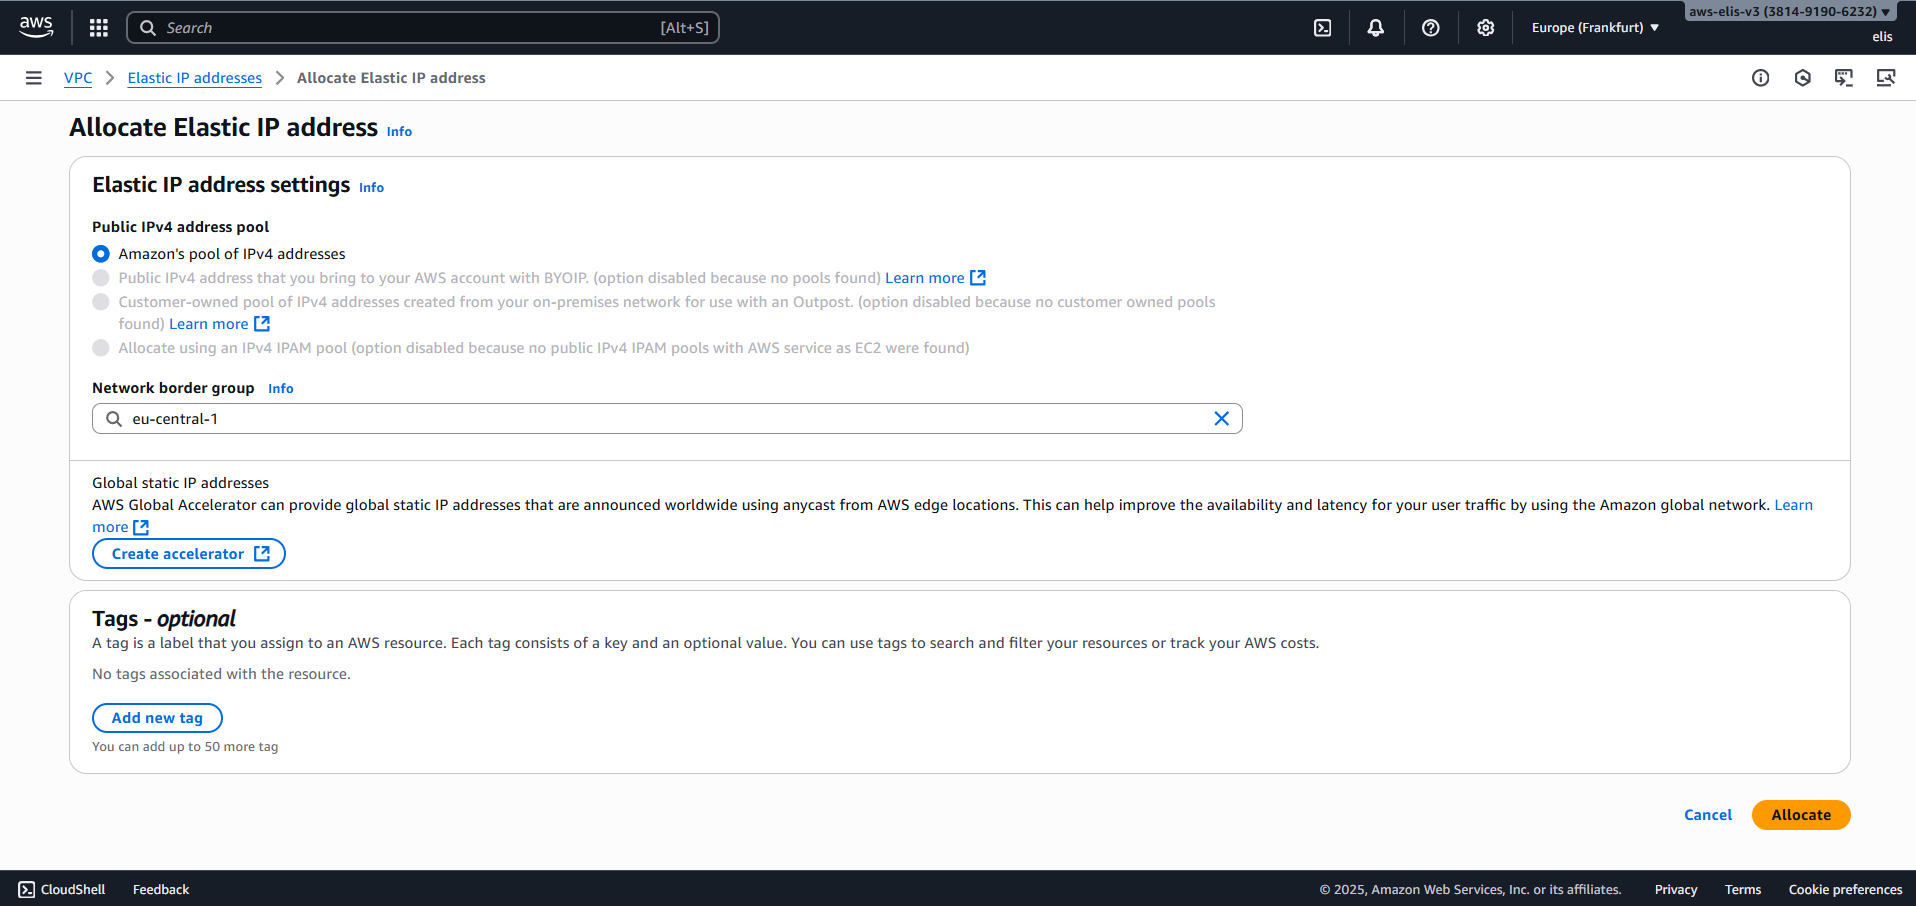
1. Allocate Elastic IP
Go to VPC → Elastic IPs → Allocate Elastic IP Address.
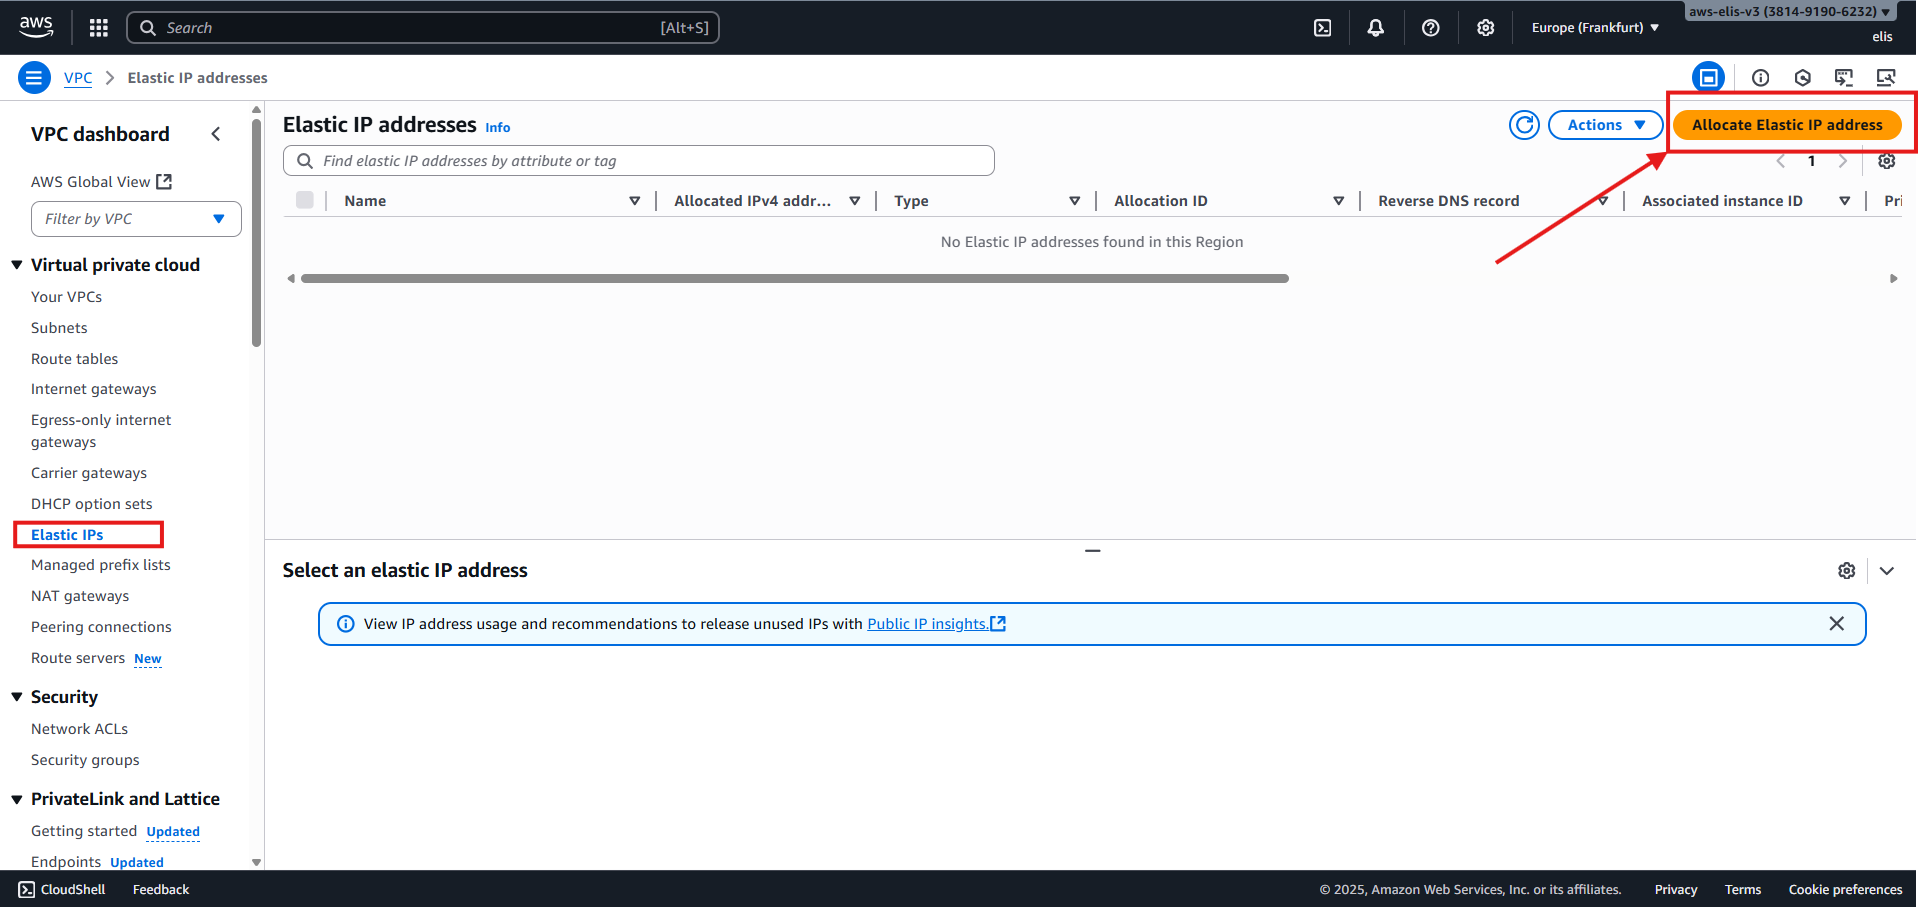
Our Elastic IP:
3.126.86.249
2. Create NAT Gateway
Go to VPC → NAT Gateways → Create NAT Gateway:
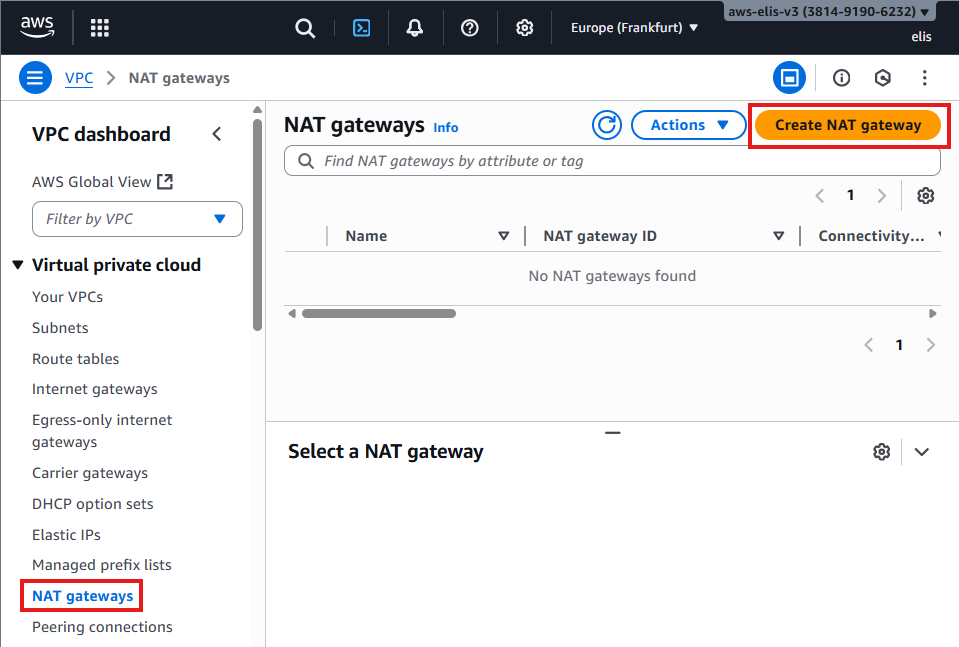
- Name:
MyNATGateway - Subnet: Public Subnet (must have route to IGW)
- Elastic IP: Use the one allocated
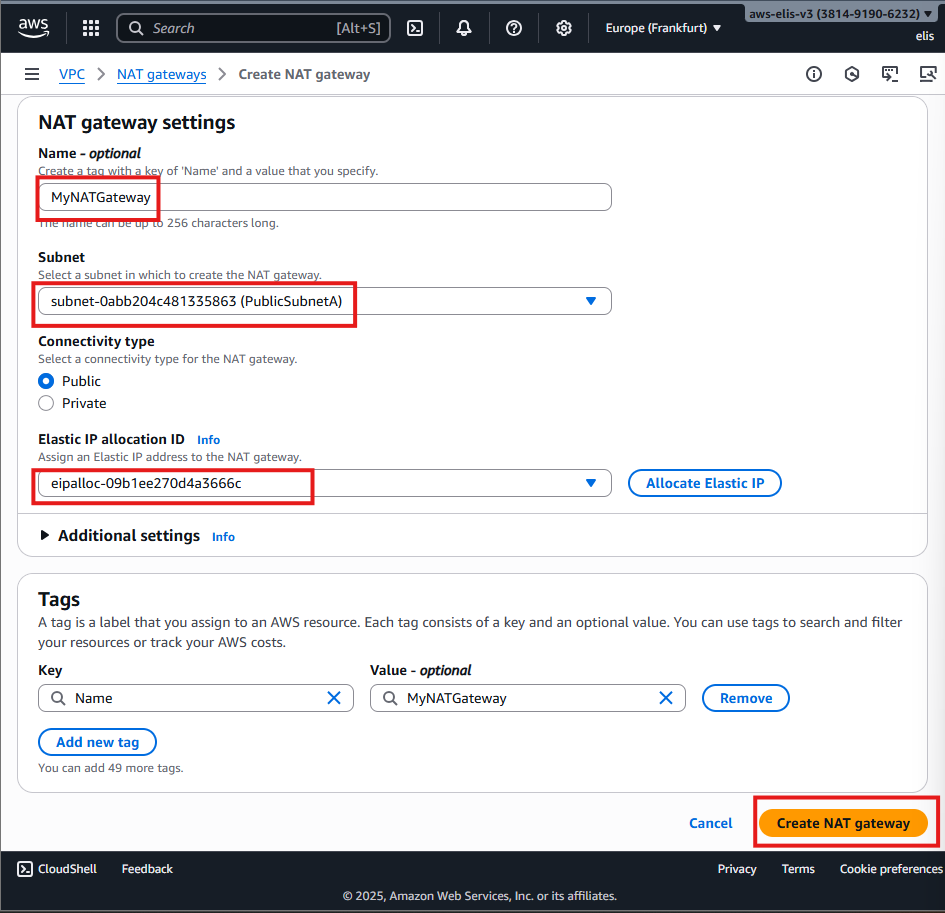
Wait until Status = Available.

3. Update Private Route Table
Add a new route in the Private Route Table:
- Destination:
0.0.0.0/0 - Target:
MyNATGateway

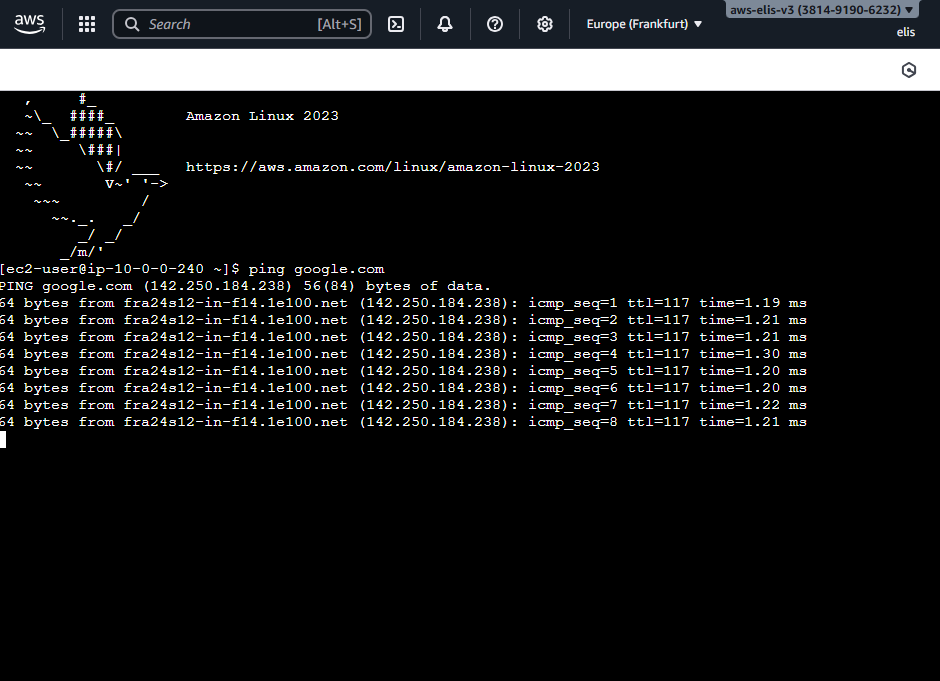
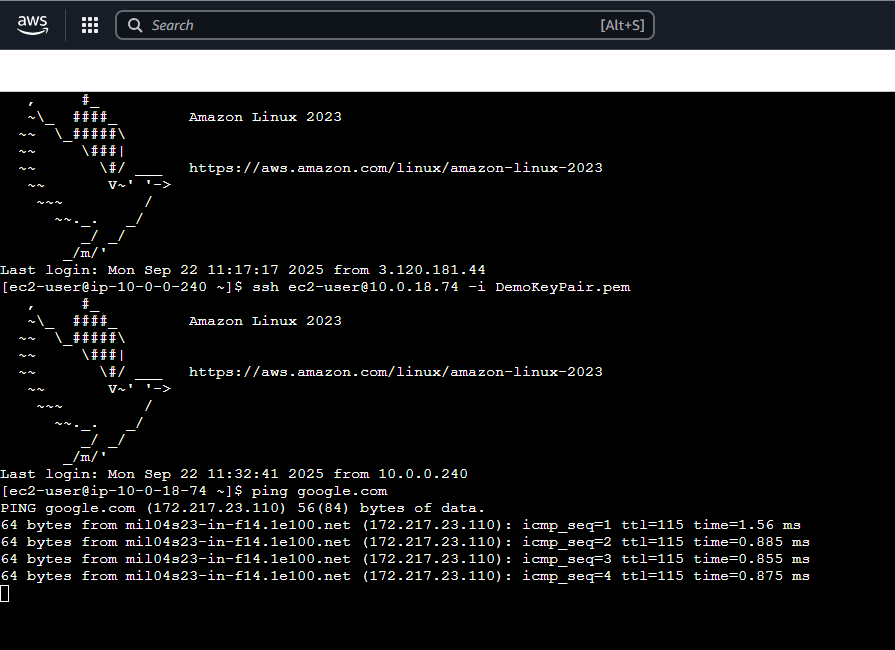
Now our private EC2 can access the internet:
1
2
ssh -i "DemoKeyPair.pem" ec2-user@10.0.18.74
ping google.com
NATGW requires IGW: Private Subnet → NATGW → IGW
9. HTTP Test on Bastion Host 🌐
1
2
3
4
5
6
sudo yum install -y httpd
sudo systemctl enable httpd
sudo systemctl start httpd
sudo su
echo "hello world" > /var/www/html/index.html
cat /var/www/html/index.html
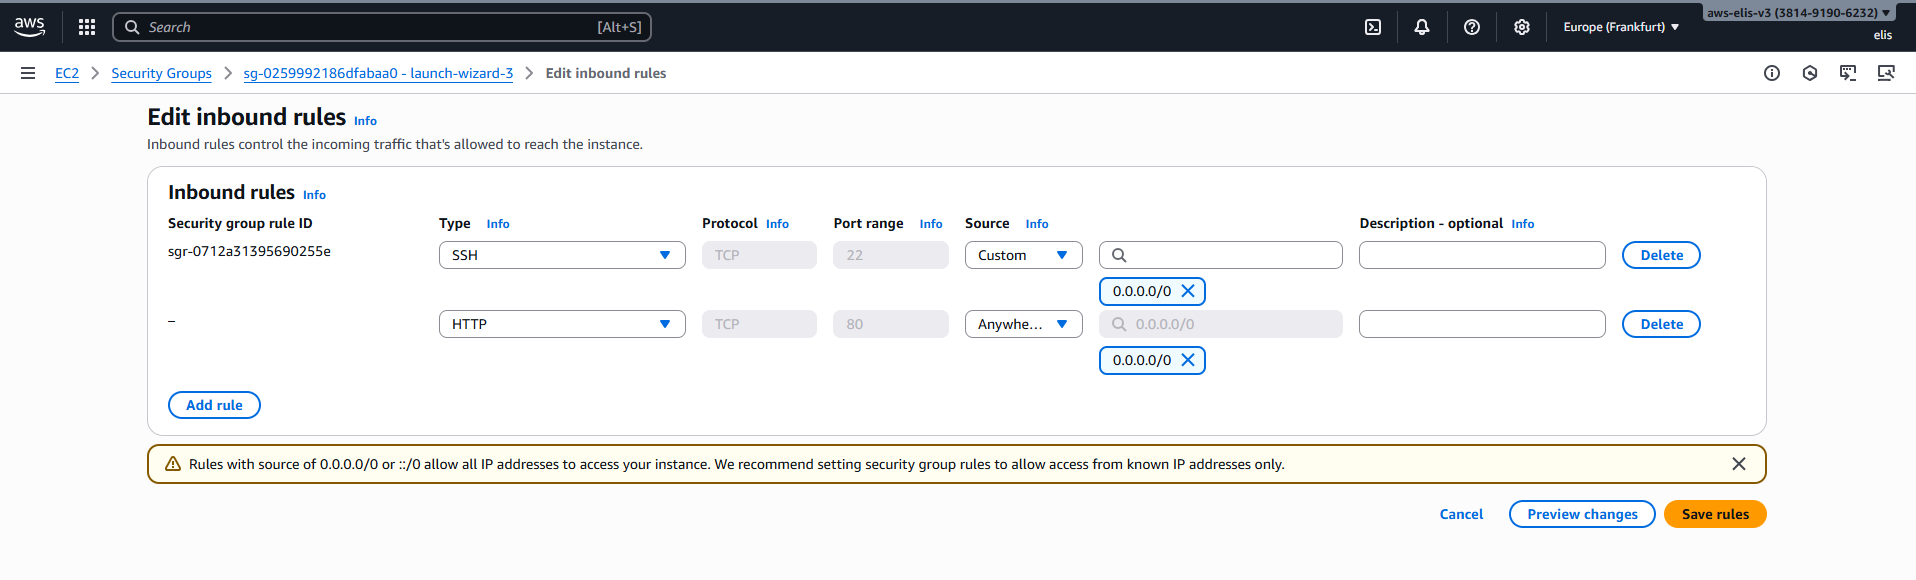
- Update Bastion Host Security Group to allow HTTP (port 80) from anywhere:
- Open browser: http://
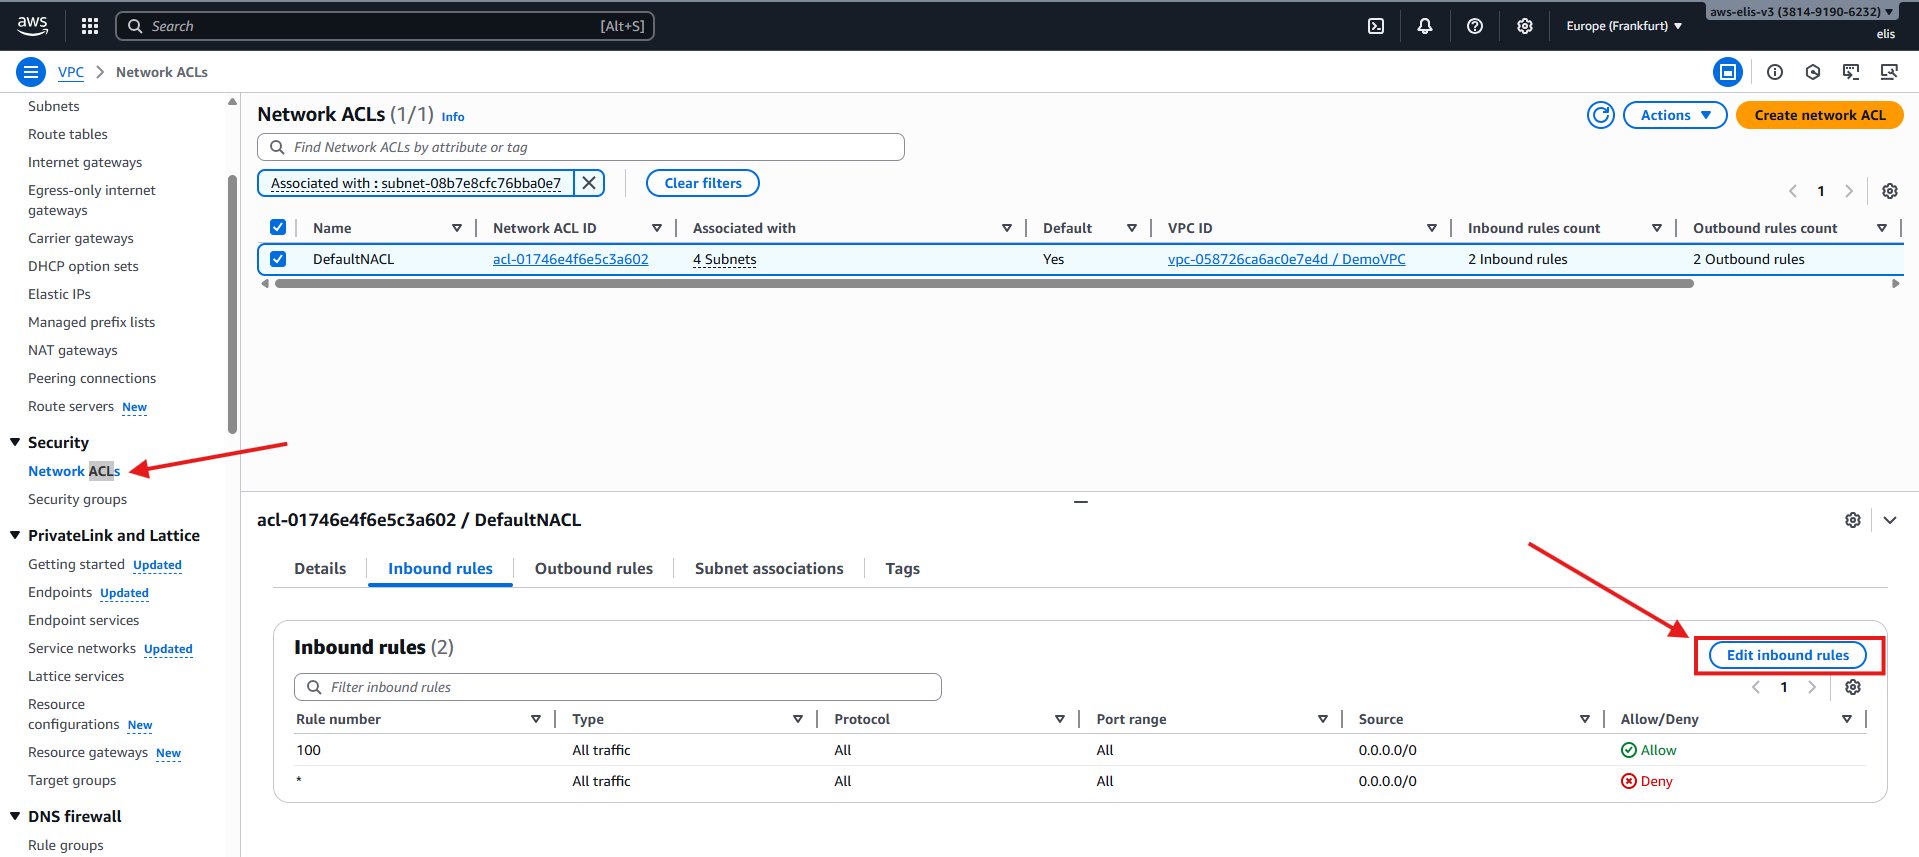
10. Network ACLs (NACLs) 🔒
Let’s check our Network ACLs and see how they work. For testing purposes, we’ll modify rules to observe how they affect traffic.
Default ACL is attached to all subnets.
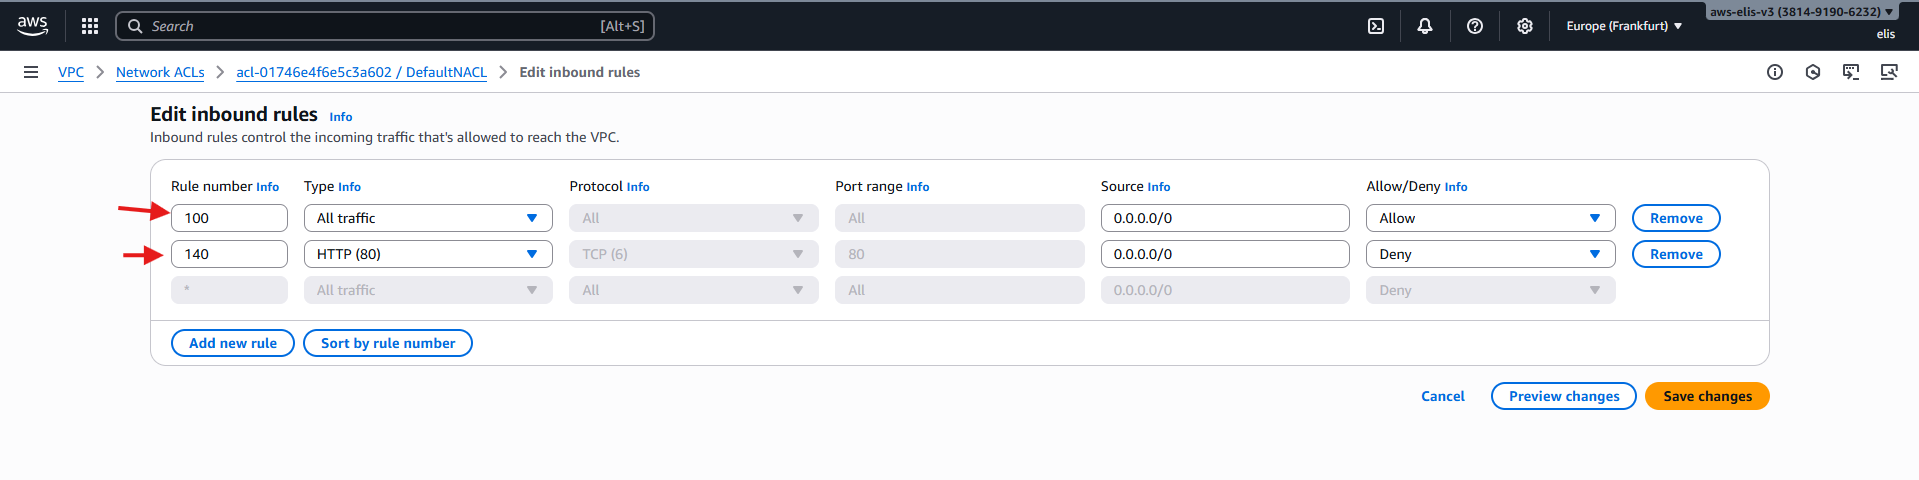
Add HTTP Deny Rule
Rule number: 80
Inbound: Deny port 80
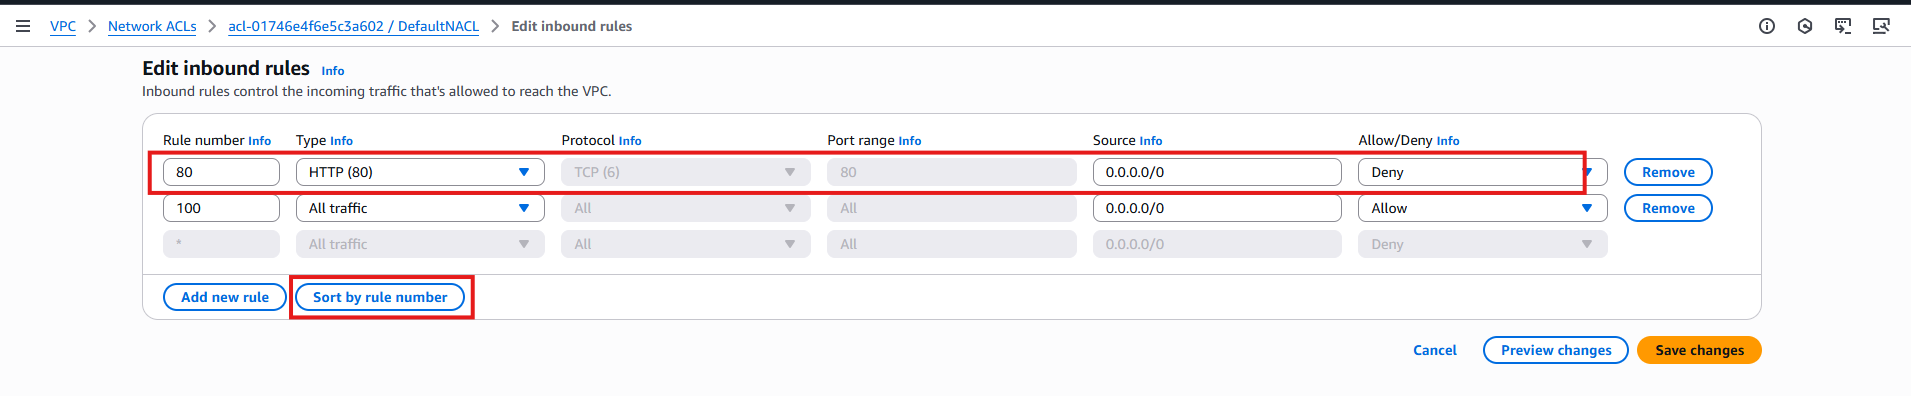
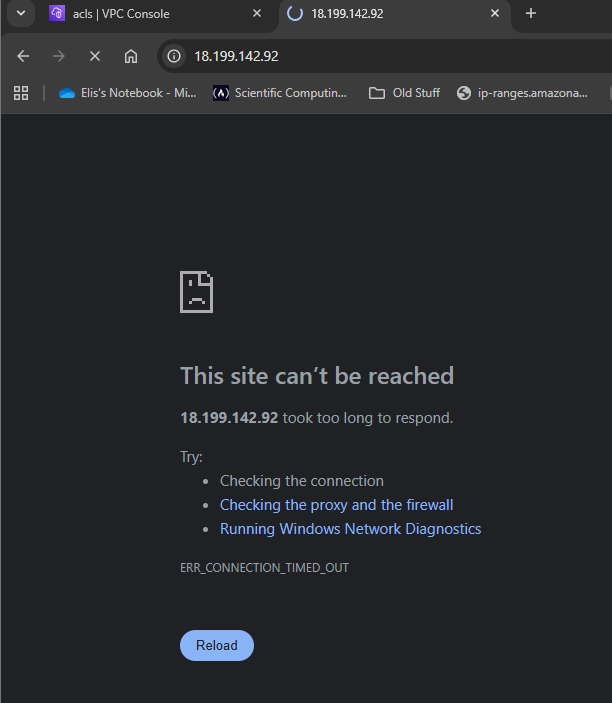
- Try to access HTTP → fails
Now let’s set up our inbound rule number to 140 and see that connection will be successful, since, they have numerical priority and our http allow rule number 100 has precedence over rule number 140 , deny acccess.
We already have our HTTP ALLOW access rule
Rule number: 100
Inbound: Allow port 80
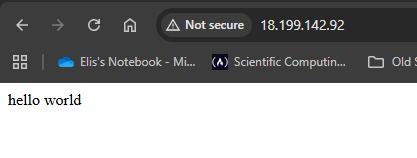
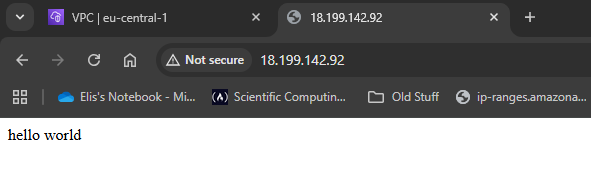
- Now if we refresh our website for our public ip we can see that it will now show hello world!
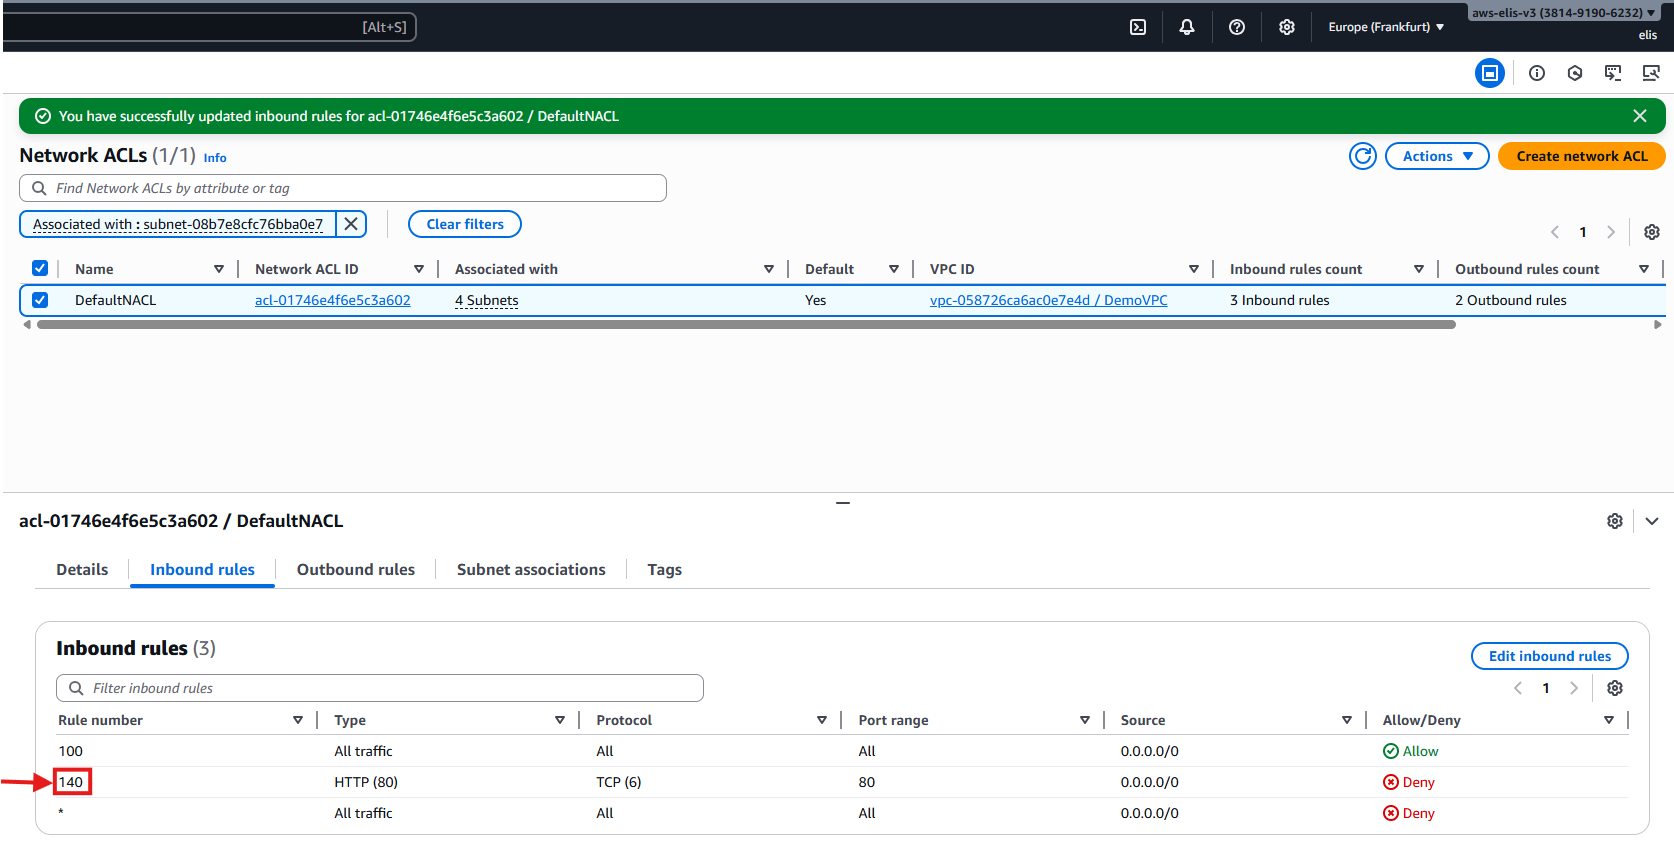
- Now as you can see our NACL inbound security group that our newly created rules appear in order in our dashboard, since 100 has precedence over 140.
- We’re not going to show this now, but you can test it, that the same applies for outbound rules, if you remove access to everyone in outbound traffic, that will block return traffic and connection will fail. So it’s good practice, if we have issues with our connection to our instance, to not just check security groups but also our Network NACLs, which act at the subnet level, while Security Groups act on the attached EC2 instances
Note: NACLs are stateless. Security Groups are stateful. Outbound restrictions affect NAT/EC2 differently.
- So if for example we remove our outbound rules, it will still allow us to connect to the instance, because our inbound connection has already been allowed so we will automatically be bypassed in our return traffic
11. VPC Peering 🔗
VPC Peering requires non-overlapping CIDRs and is non-transitive.
Peering Diagram
Peer DemoVPC (10.0.0.0/16) → DefaultVPC (172.31.0.0/16)
Step 1: Create Peering Connection
Now we will establish a Peering connection between our DemoVPC and DefaultVPC (we’ve renamed our AWS default VPC DefaultVPC)
- Go to VPC → Peering Connections → Create Peering Connection
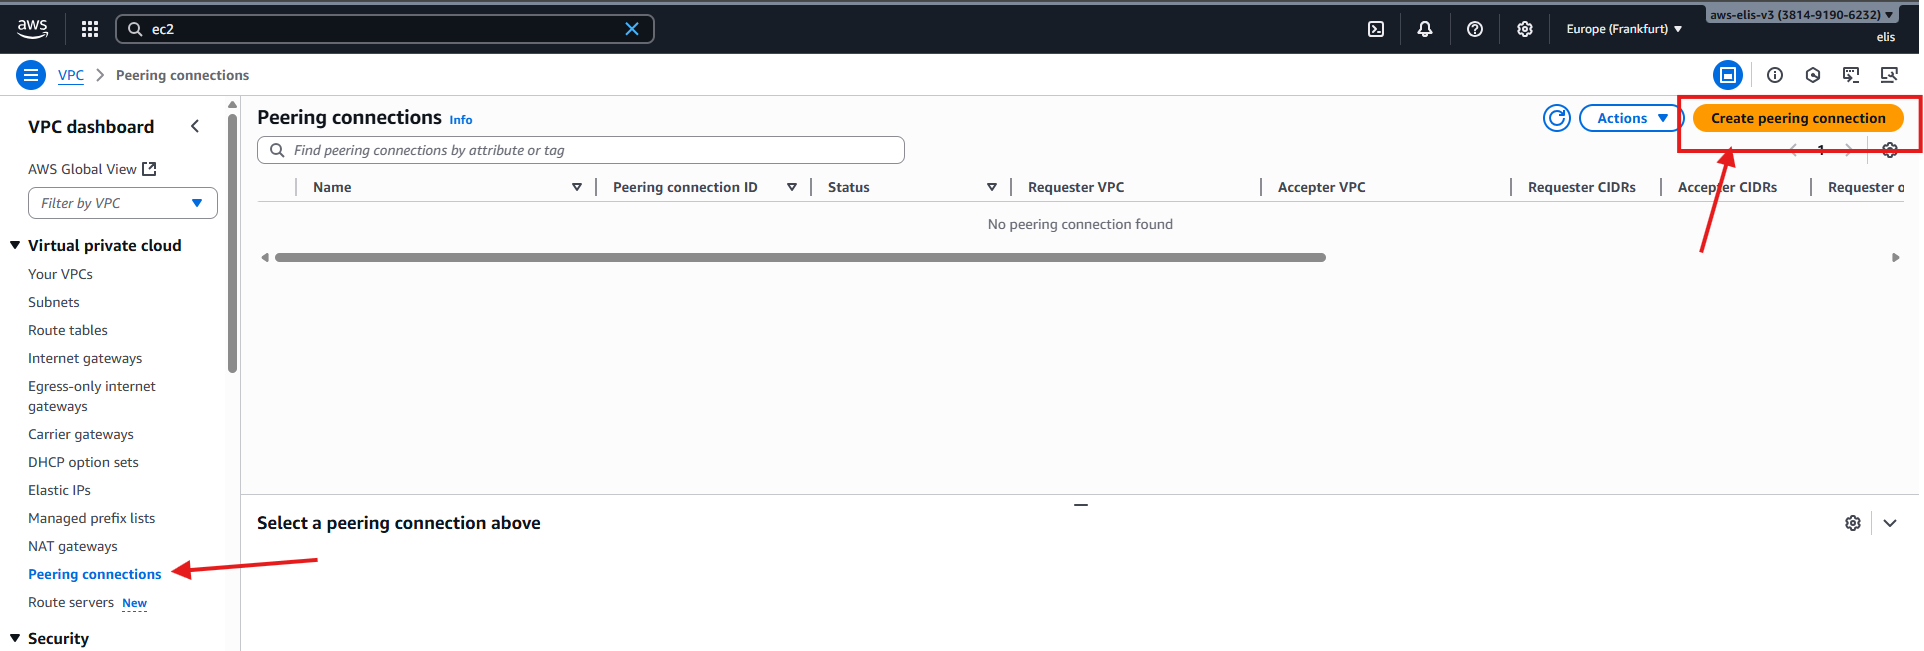
Select DemoVPC → DefaultVPC
Ensure CIDRs do not overlap

Step 2: Accept Peering
- Accept the pending peering connection in the console
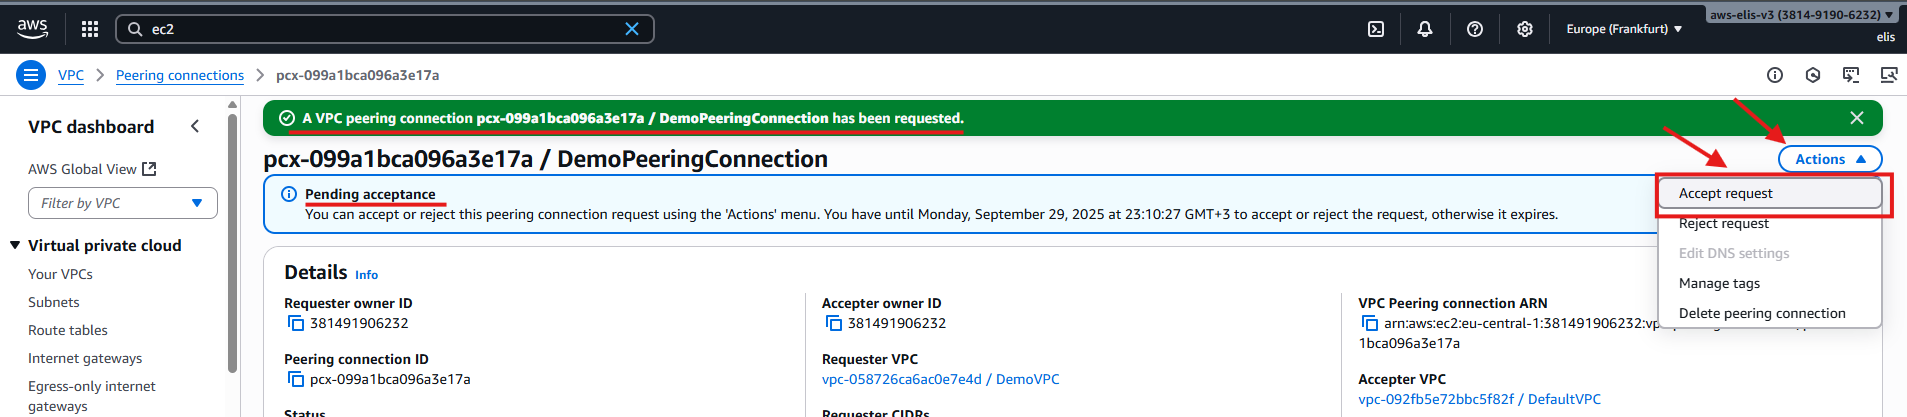
- Status: Active

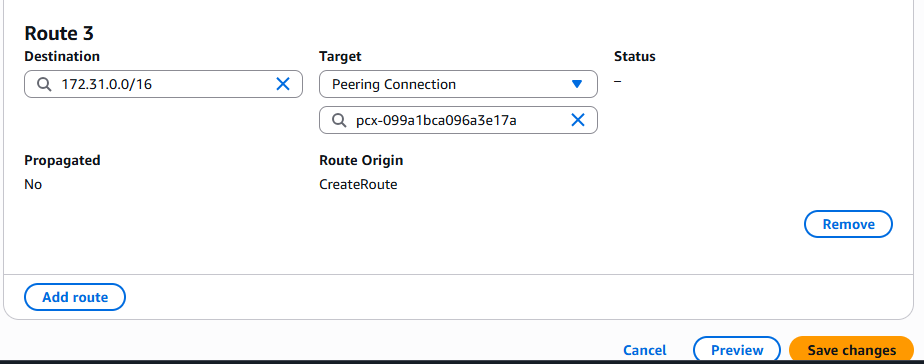
Step 3: Update Route Tables
DemoVPC Private Route Table:
- Destination:
172.31.0.0/16 - Target: Peering connection
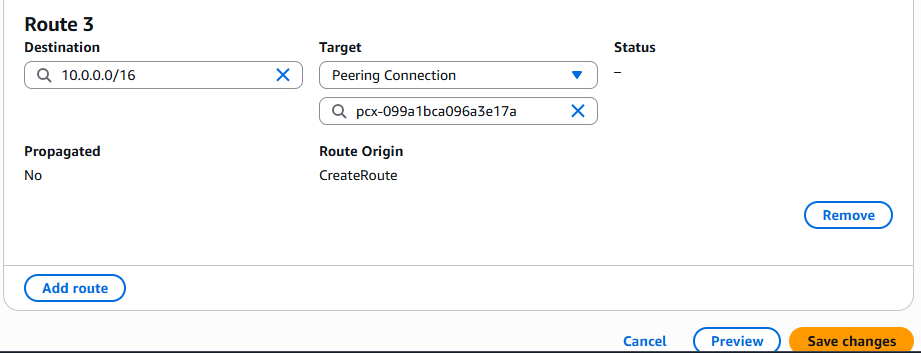
DefaultVPC Route Table:
- Destination:
10.0.0.0/16 - Target: Peering connection
Step 4: Test Connectivity
1
2
ssh -i "DemoKeyPair.pem" ec2-user@10.0.18.74
curl <Private-IP-BastionHost>
Connection works after updating both route tables.
12. VPC Endpoints (PrivateLink) 🛠️
VPC Endpoints allow private EC2 instances to access AWS services internally without going through the internet (IGW/NATGW). This improves security and efficiency.

Step 1: Test Current S3 Access (via NAT)
1
2
3
ssh -i "DemoKeyPair.pem" ec2-user@10.0.18.74
aws s3 ls
curl https://www.google.com
Step 2: Remove NAT Gateway Route
- Edit PrivateRouteTable → Remove route 0.0.0.0/0 pointing to NATGW
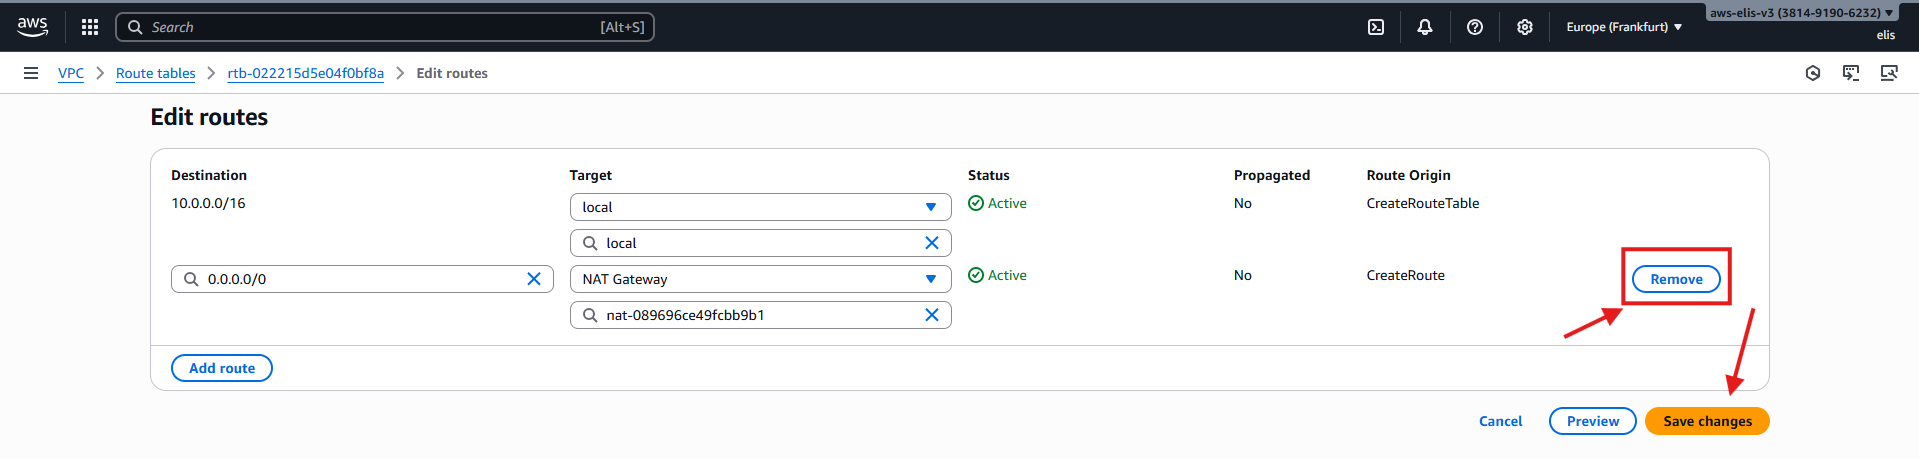
- Test connectivity again:
1
2
aws s3 ls
curl https://www.google.com
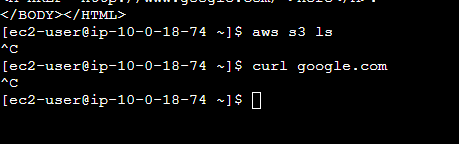
Access fails since internet is disconnected. Now we will use VPC Endpoint.
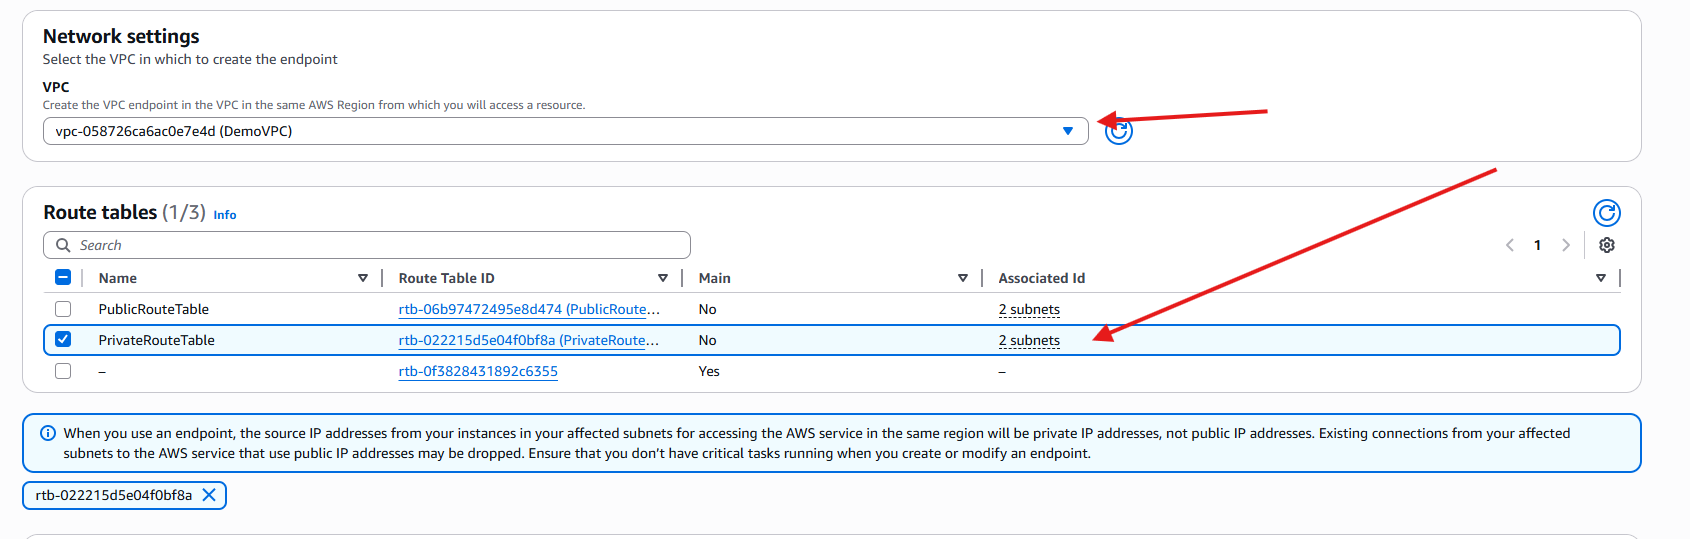
Step 3: Create VPC Endpoint (S3 Gateway)
- Navigate to VPC → Endpoints → Create Endpoint
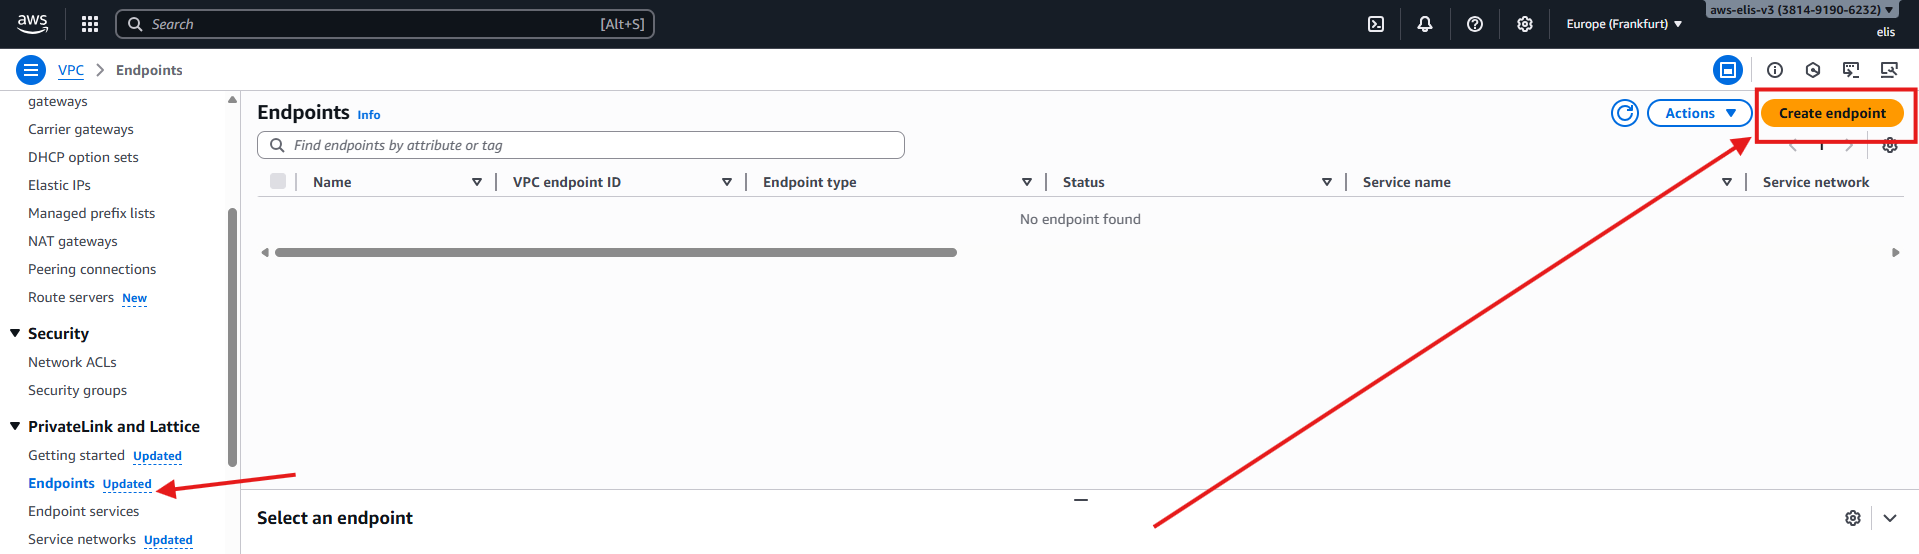
- Select AWS Services, then choose S3 Gateway
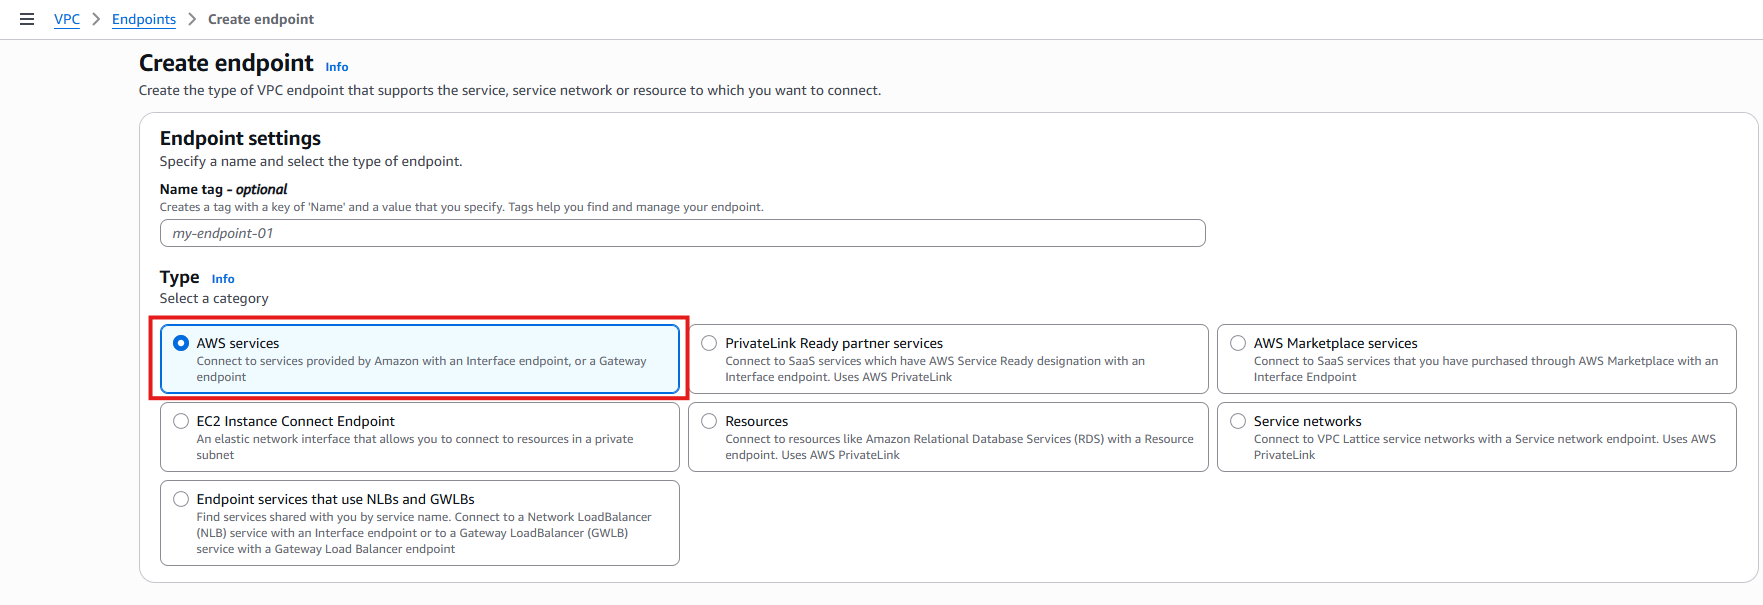

- Select DemoVPC and PrivateRouteTable

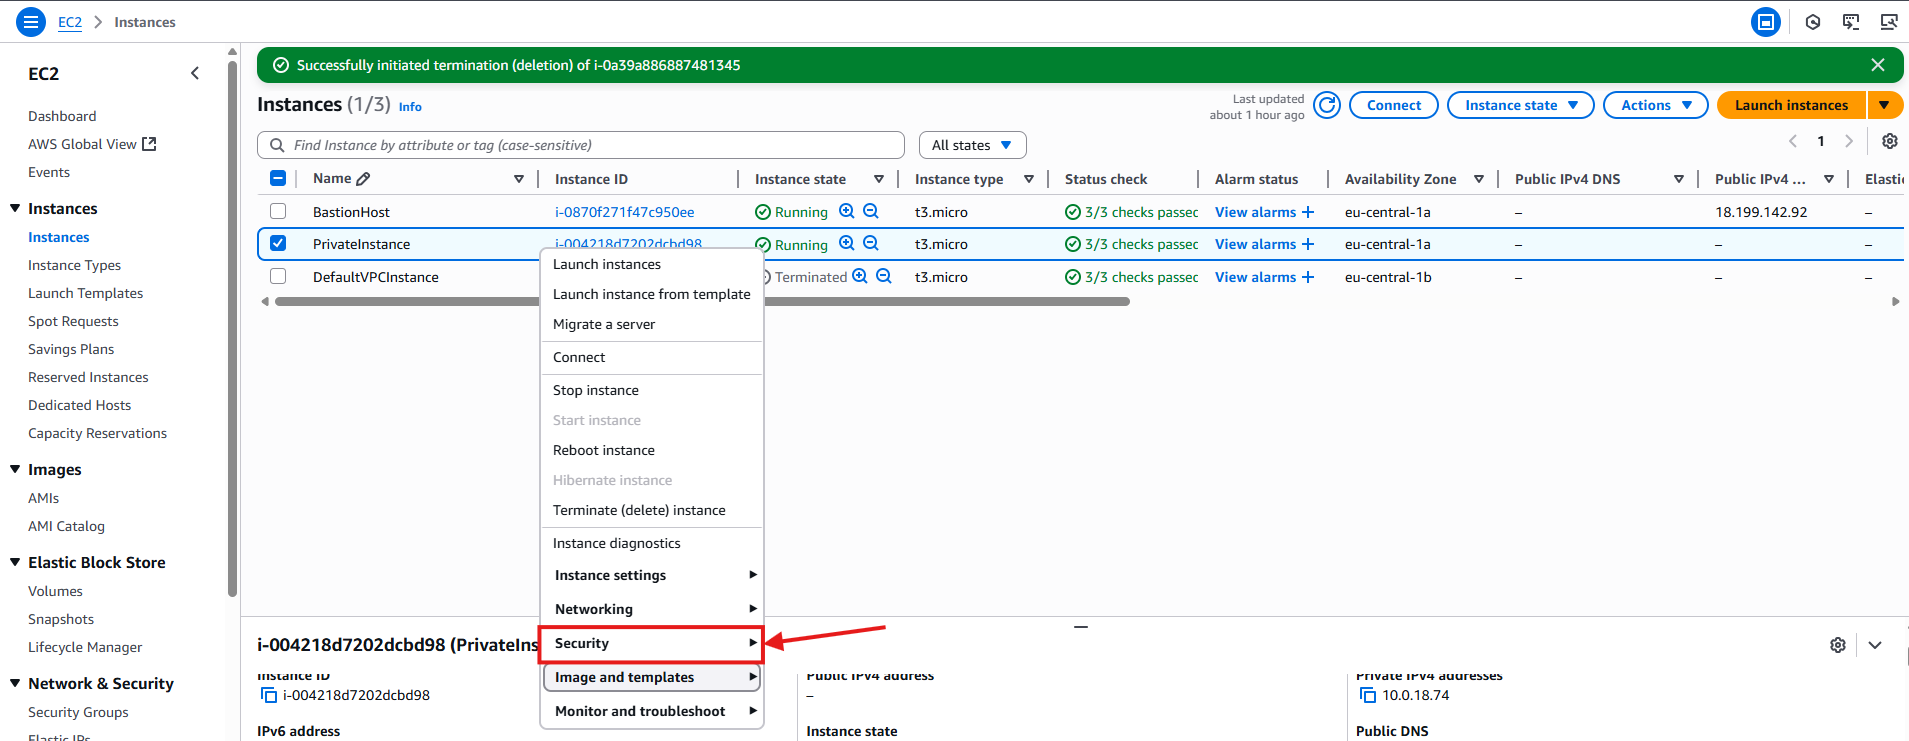
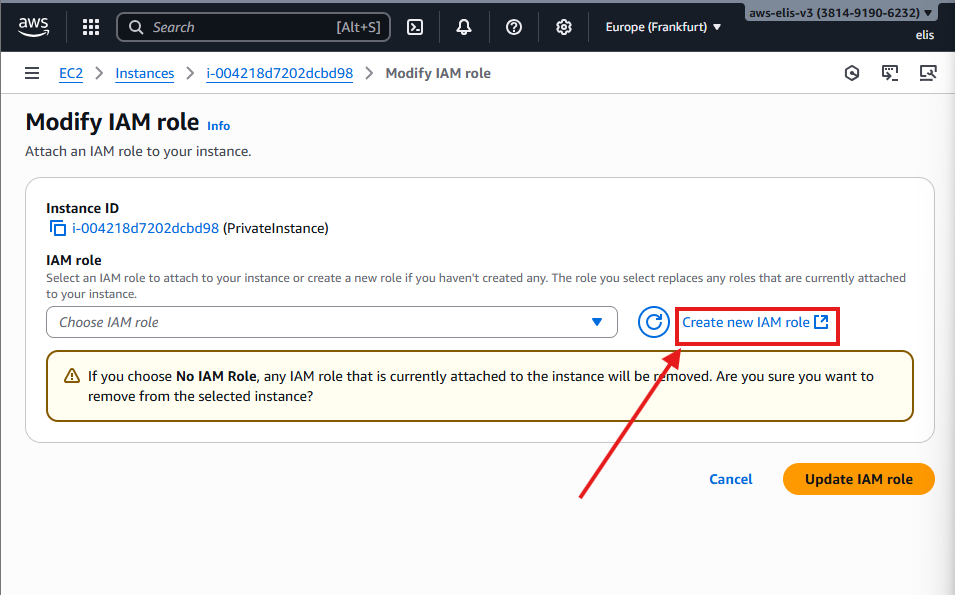
For this matter, we also have to create a role for this instance in order to be able to access S3 from within it so in our EC2 Instances dashboard, right click our PrivateInstance, Security and press modify IAM Role
Now let’s press on create IAM Role
Now in IAM press create role 
Select ec2 instance role 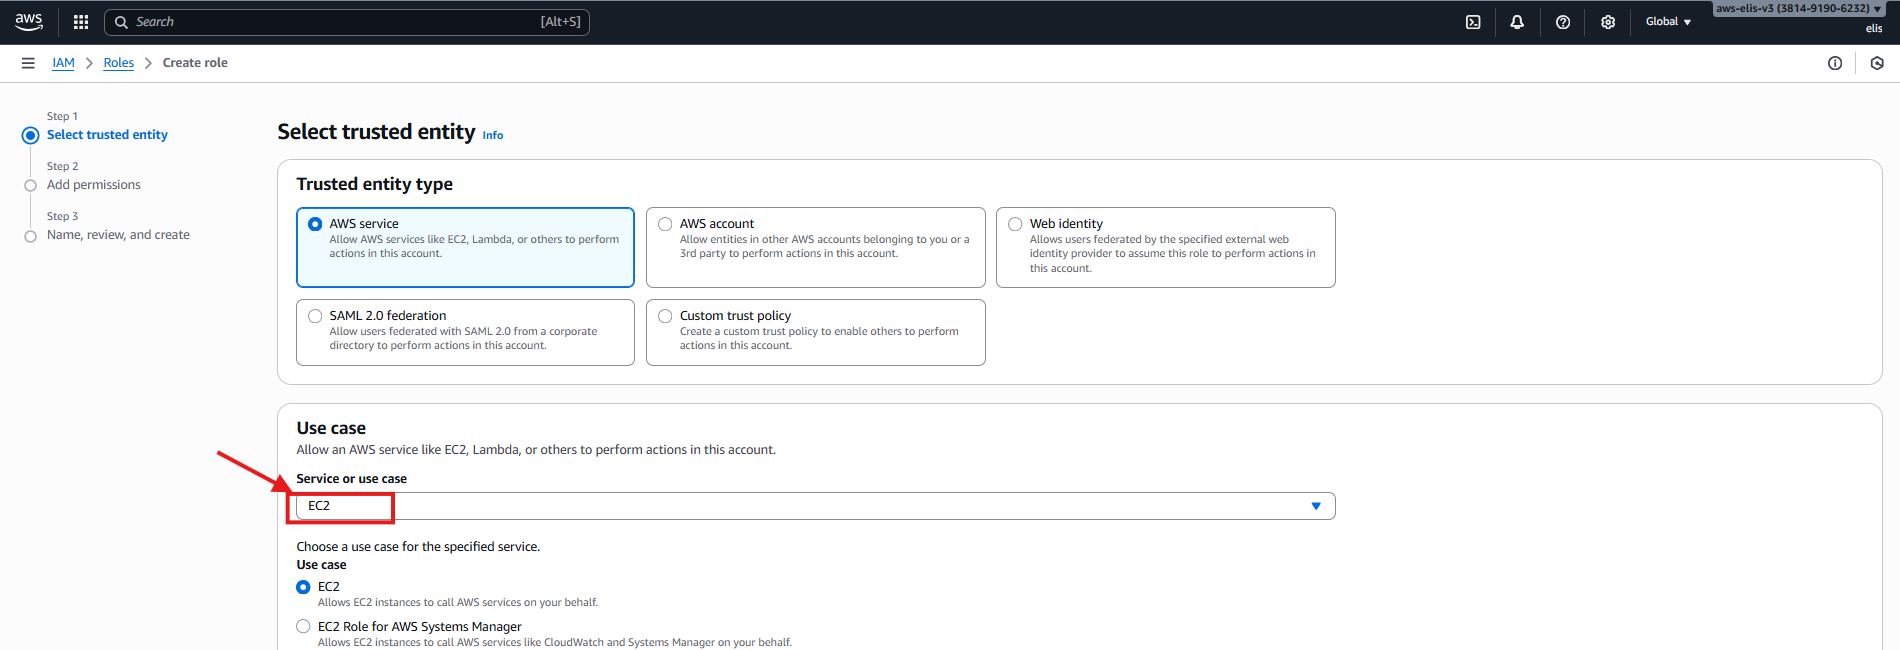
Now click on next, and for the policy select AmazonS3ReadOnlyAccess, and click on Next 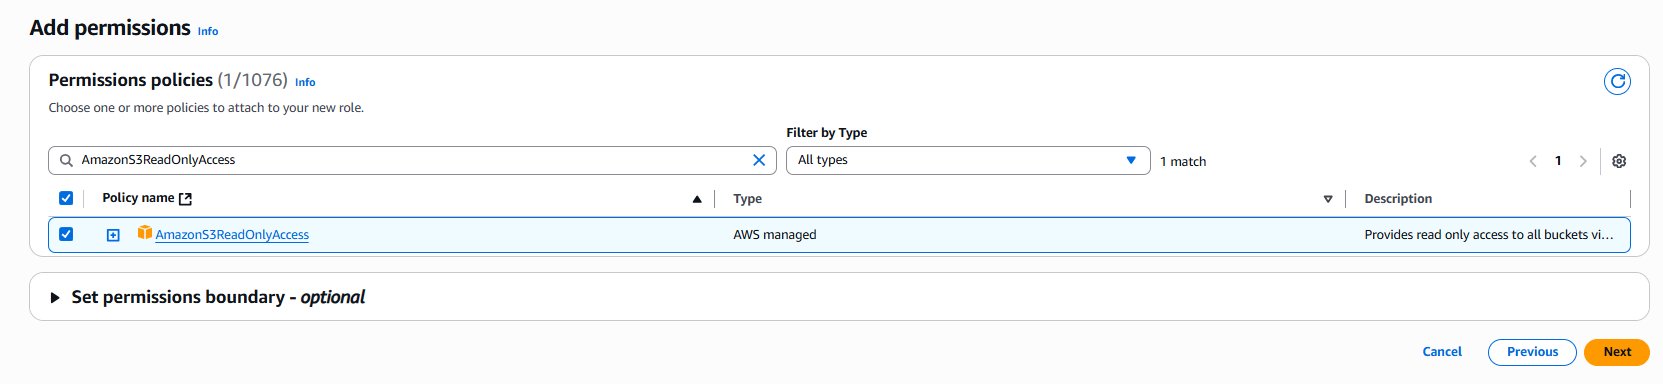
And now finally, in the review let’s give a name to our role - DemoRoleEC2-S3ReadOnly and press create Role 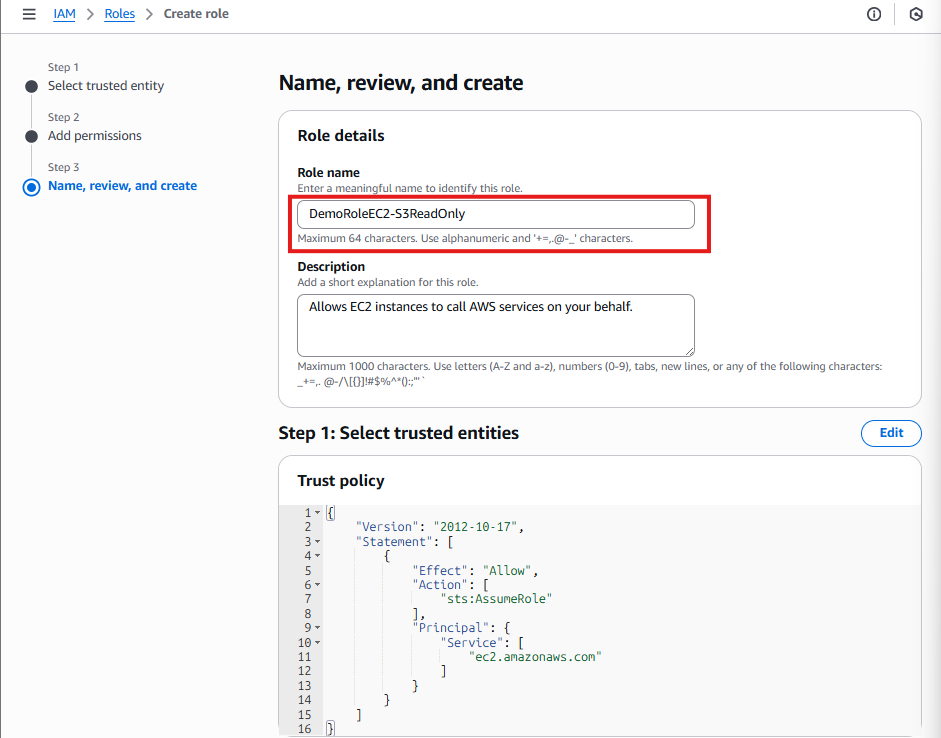
And now we can go back to our EC2 Instance, and press refresh on the role selection and select our role. 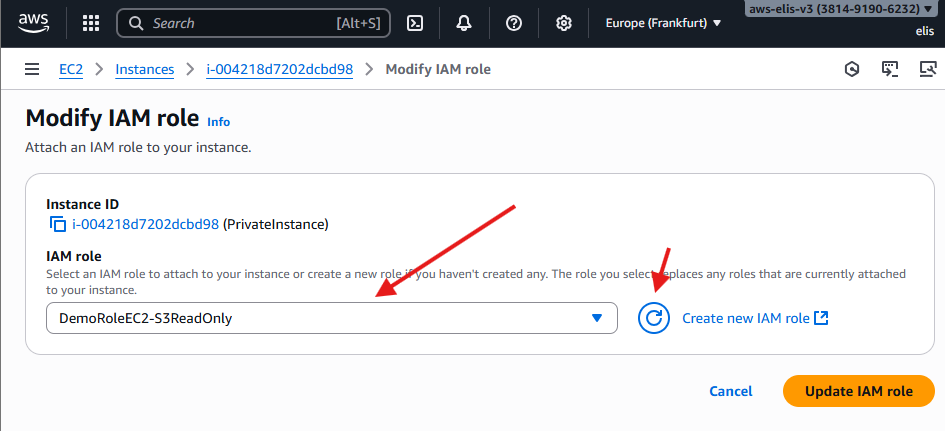
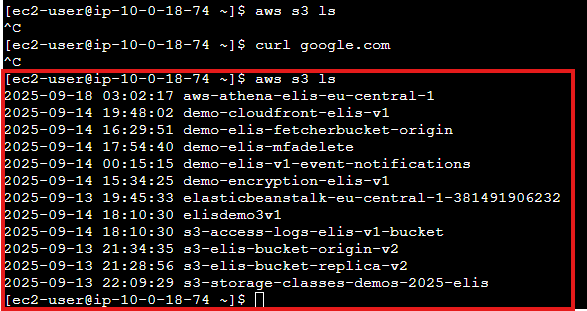
Now we will go back to our Private EC2 Instance and run aws s3 ls command we can see that it’s listed all of my s3 keys
The private instance now has permission to access S3 through the VPC Endpoint.
Step 5: Test S3 Access via Endpoint
- Connect to the private instance via Bastion and run:
1
2
3

aws s3 ls
The command succeeds. Private EC2 instance now accesses S3 without using NAT Gateway or Internet. ✅
13. Flow Logs and Monitoring 📊
Flow Logs allow you to capture network traffic metadata for your VPC, subnets, or ENIs. Sending logs to S3 or CloudWatch enables analytics and security monitoring.
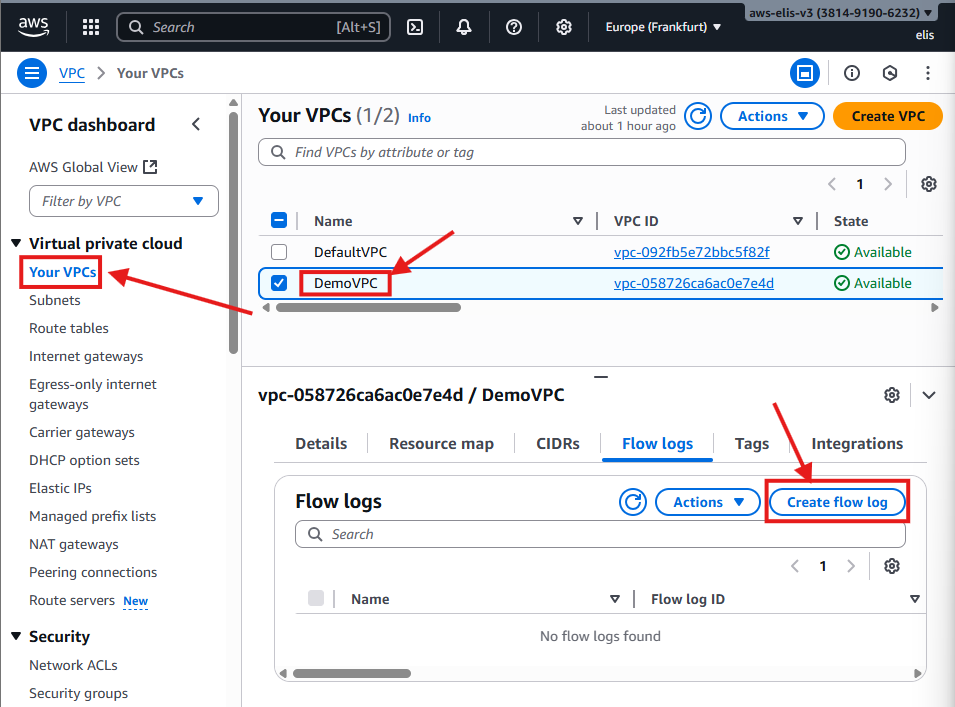
Step 1: Create Flow Log to S3
- Navigate to VPC → DemoVPC → Flow Logs → Create Flow Log
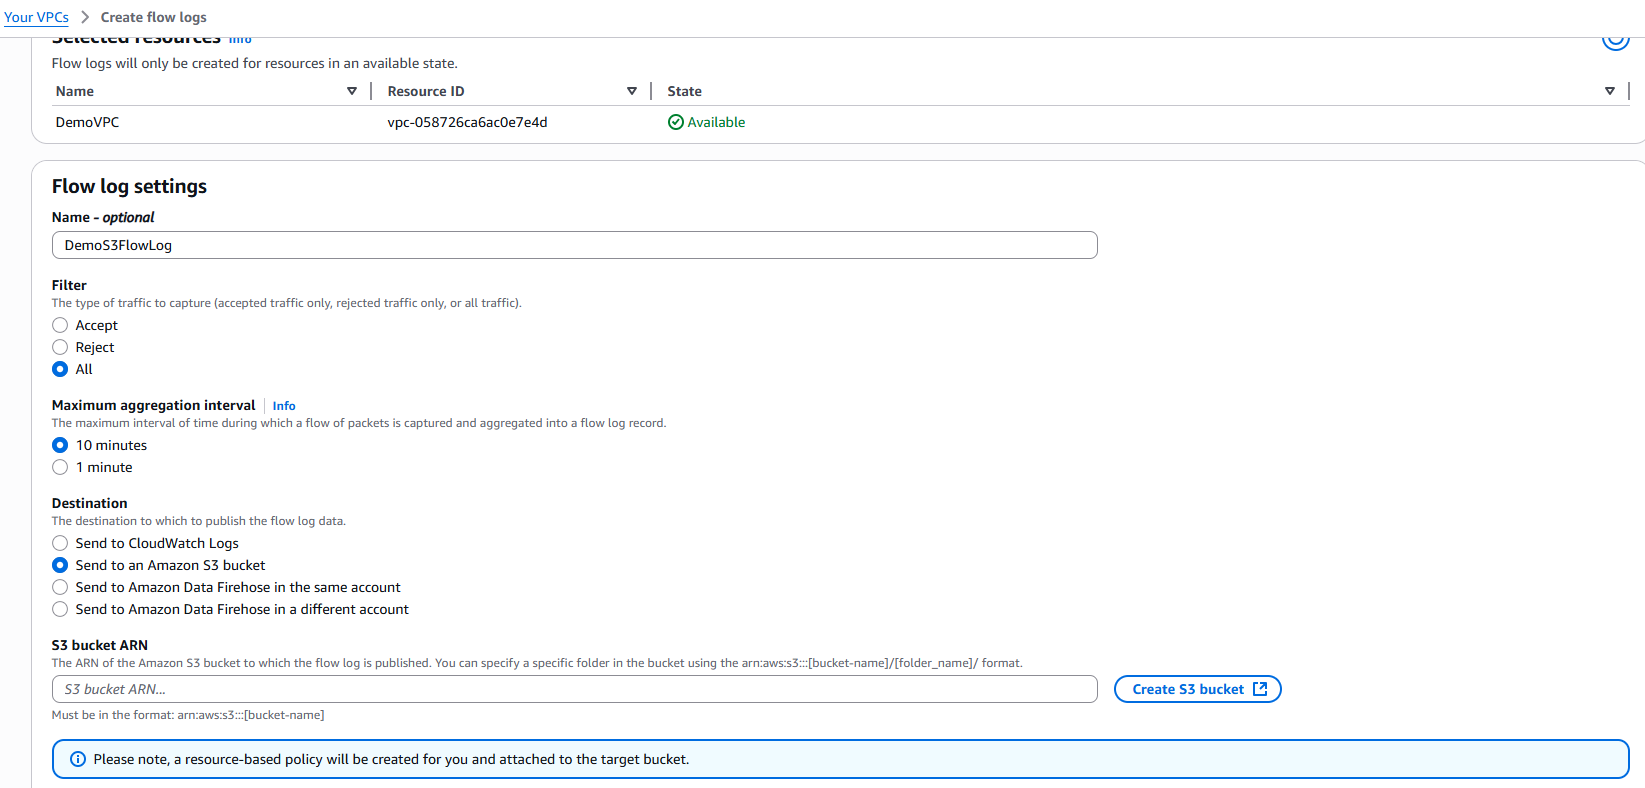
- Set:
- Name:
DemoFlowLogS3 - Maximum aggregation interval: 1 minute
- Destination: S3 Bucket
- Name:
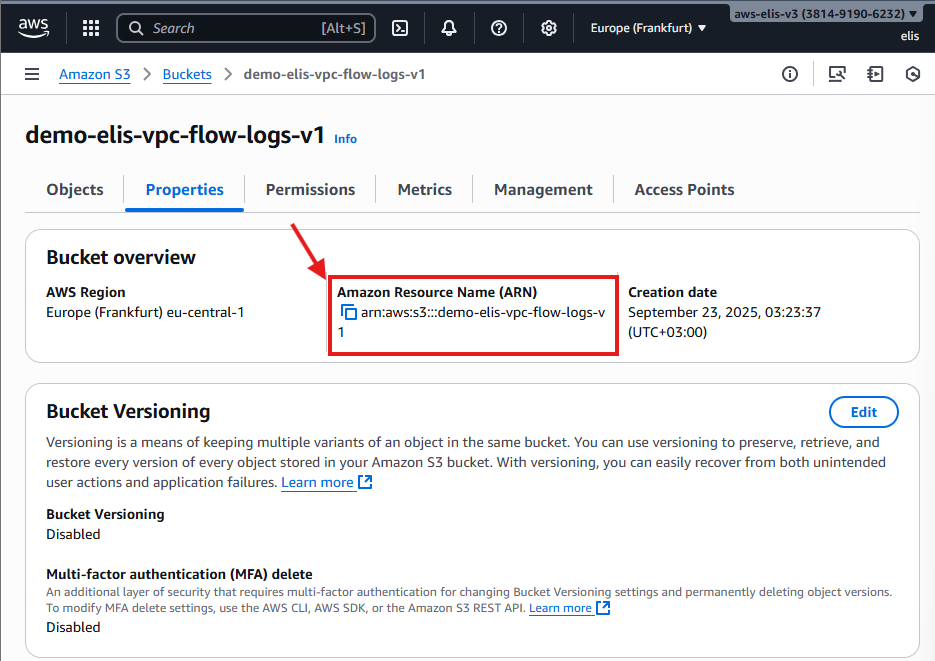
- Create S3 bucket for logs:
demo-elis-vpc-flow-logs-v1 - Copy bucket ARN and paste in Flow Log settings
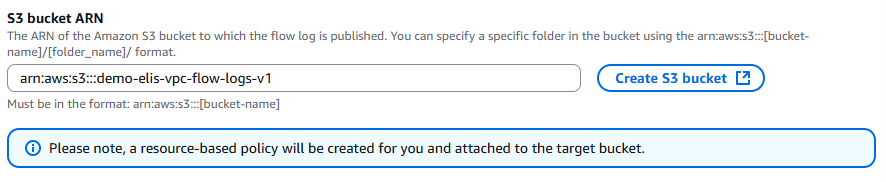
The Flow Log will automatically attach the necessary IAM policy to the S3 bucket.
Step 2: Create Flow Log to CloudWatch
- Create a Flow Log:
DemoFlowLogCWLogs
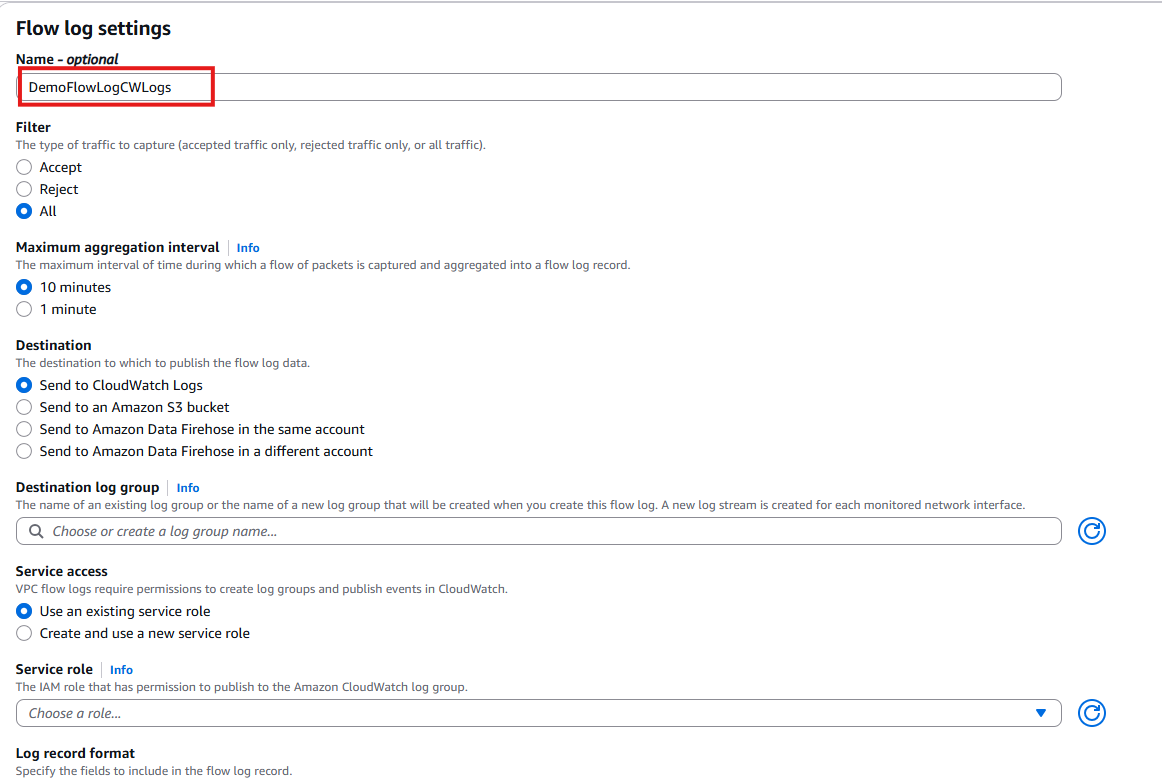
- Aggregation interval: 1 minute
- Destination: CloudWatch Logs
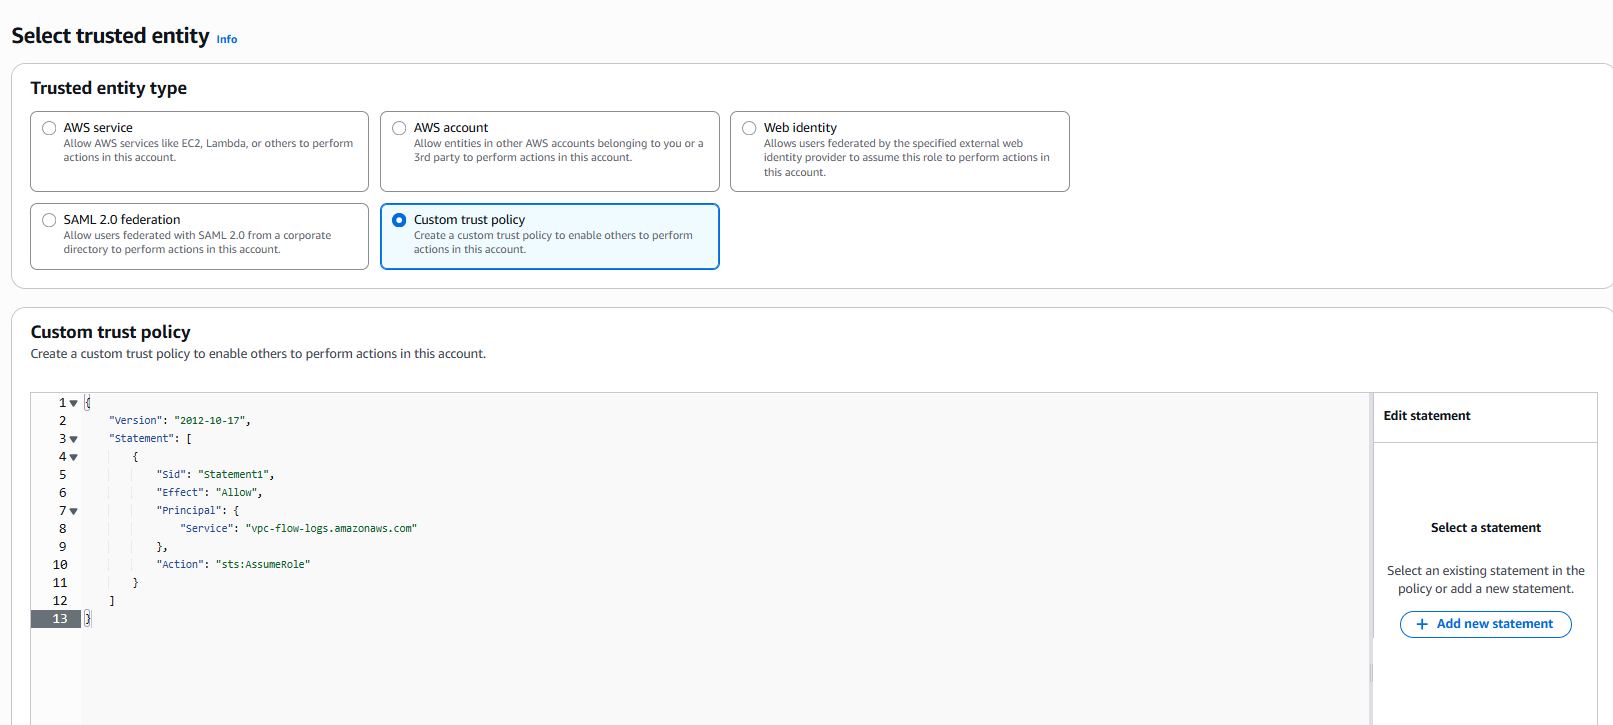
- Select Role: Trusted Entity
- Create Service Role:
1
2
3
4
5
6
7
8
9
10
11
12
13
{
  "Version": "2012-10-17",
  "Statement": [
    {
      "Sid": "Statement1",
      "Effect": "Allow",
      "Principal": {
        "Service": "vpc-flow-logs.amazonaws.com"
      },
      "Action": "sts:AssumeRole"
    }
  ]
}
- Now Click on next, Assign CloudWatchLogsFullAccess permission
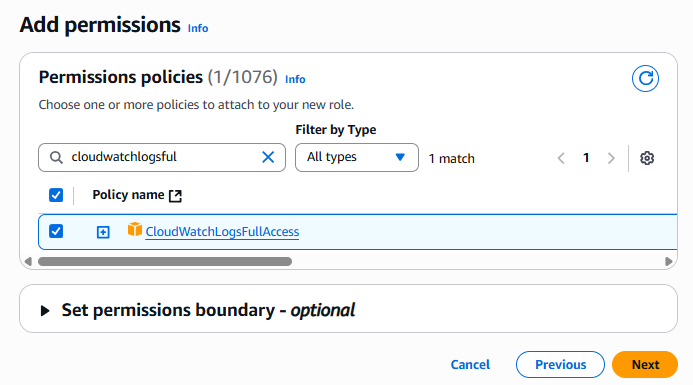
Role name: flowlogsRole
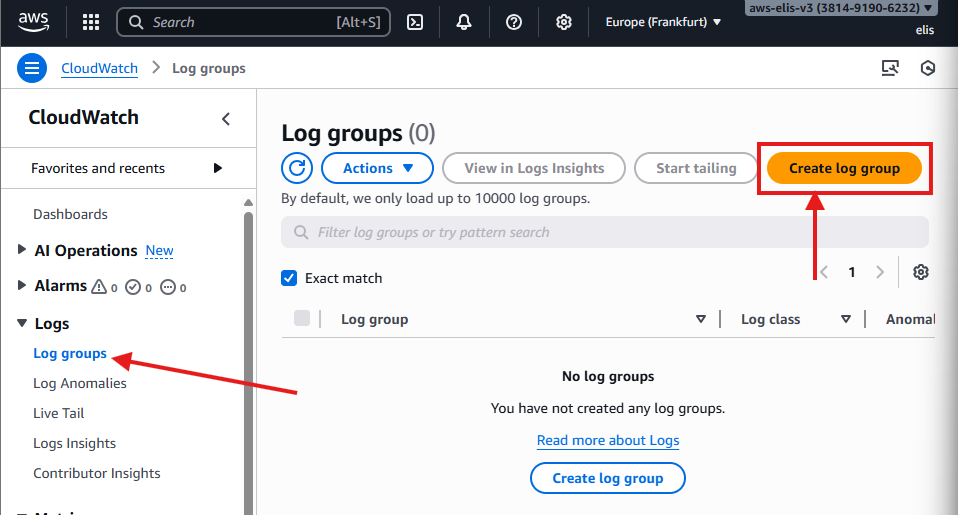
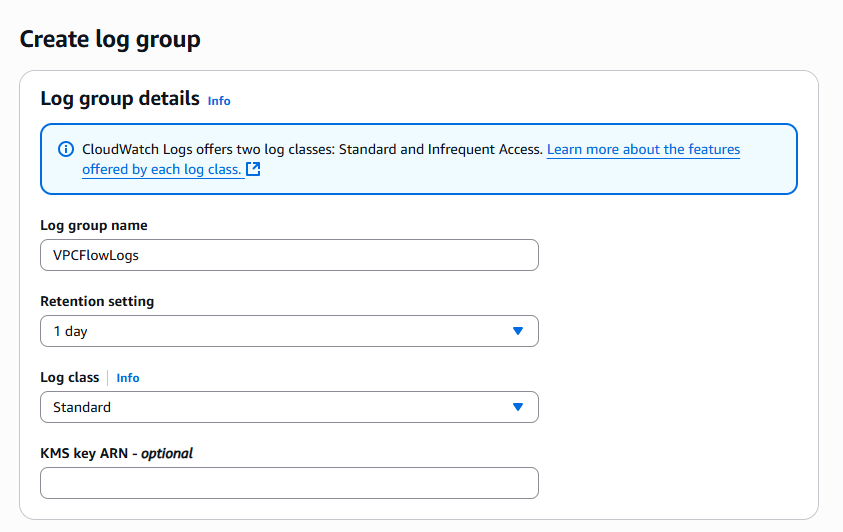
Create a Log Group in CloudWatch: VPCFlowLogs, retention: 1 day
Select Destination Log Group

Select Service Role

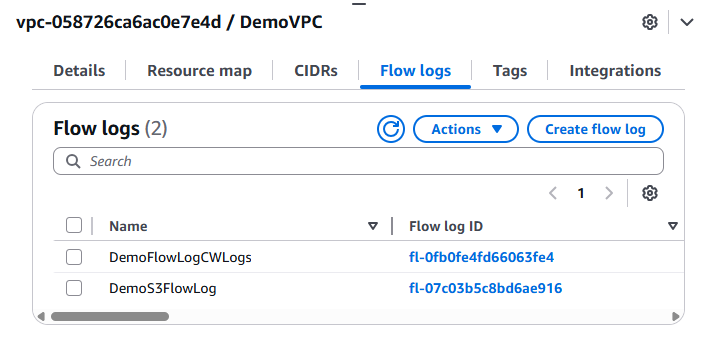
Now, Flow Logs are being captured in both S3 and CloudWatch.
If we check our S3 Bucket objects, we can observe that some logs have already been created

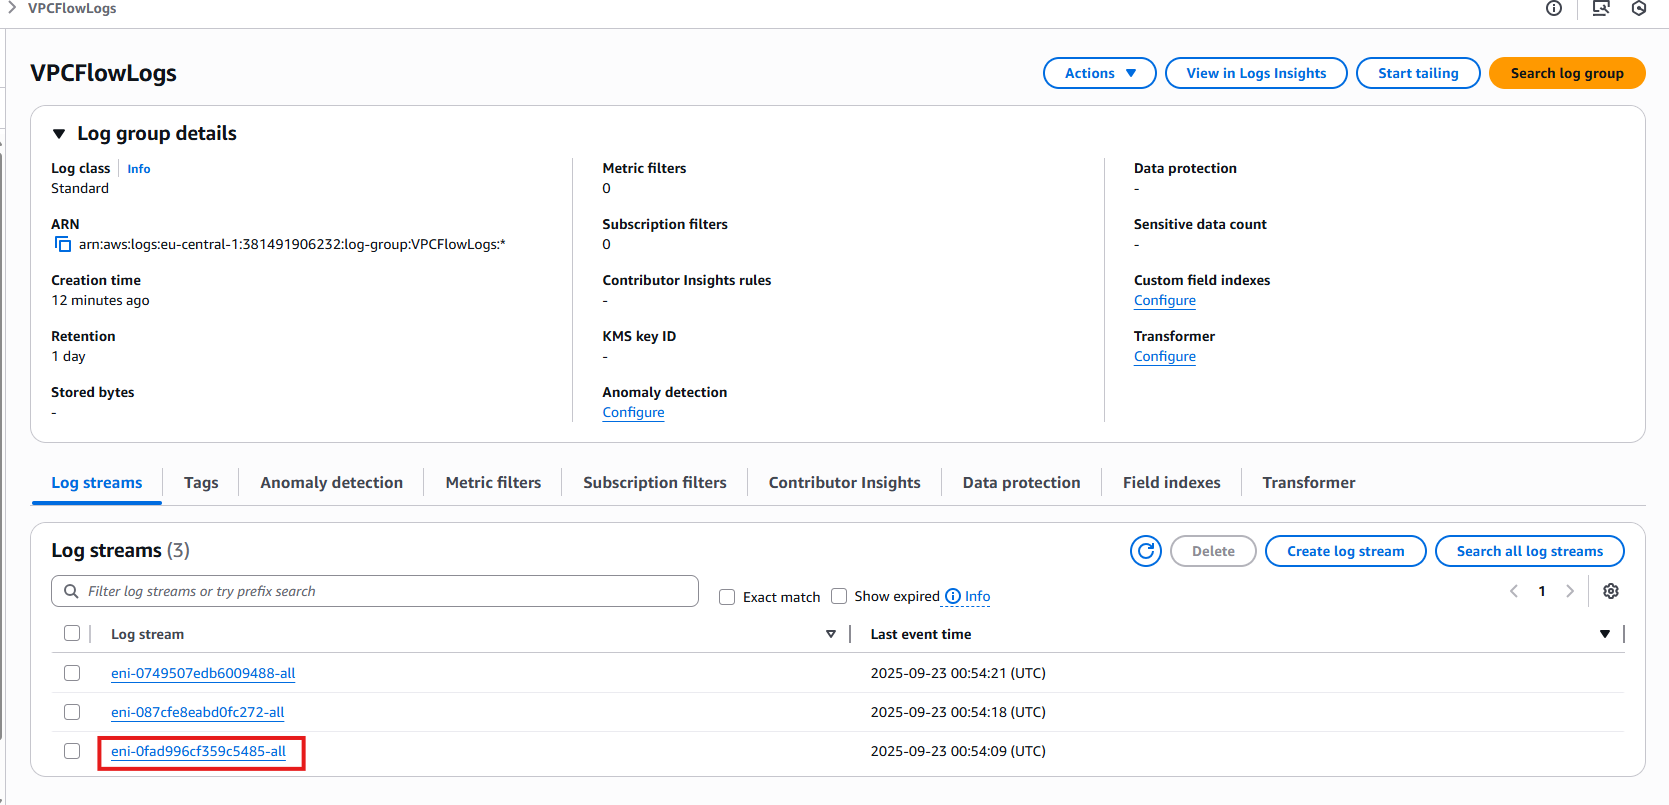
- Now let’s check CloudWatch, and see that we already have some log streams created, these are associated to our EC2 Instance attached ENI, eni-0fad996cf359c5485-all is attached to our Bastion Host,
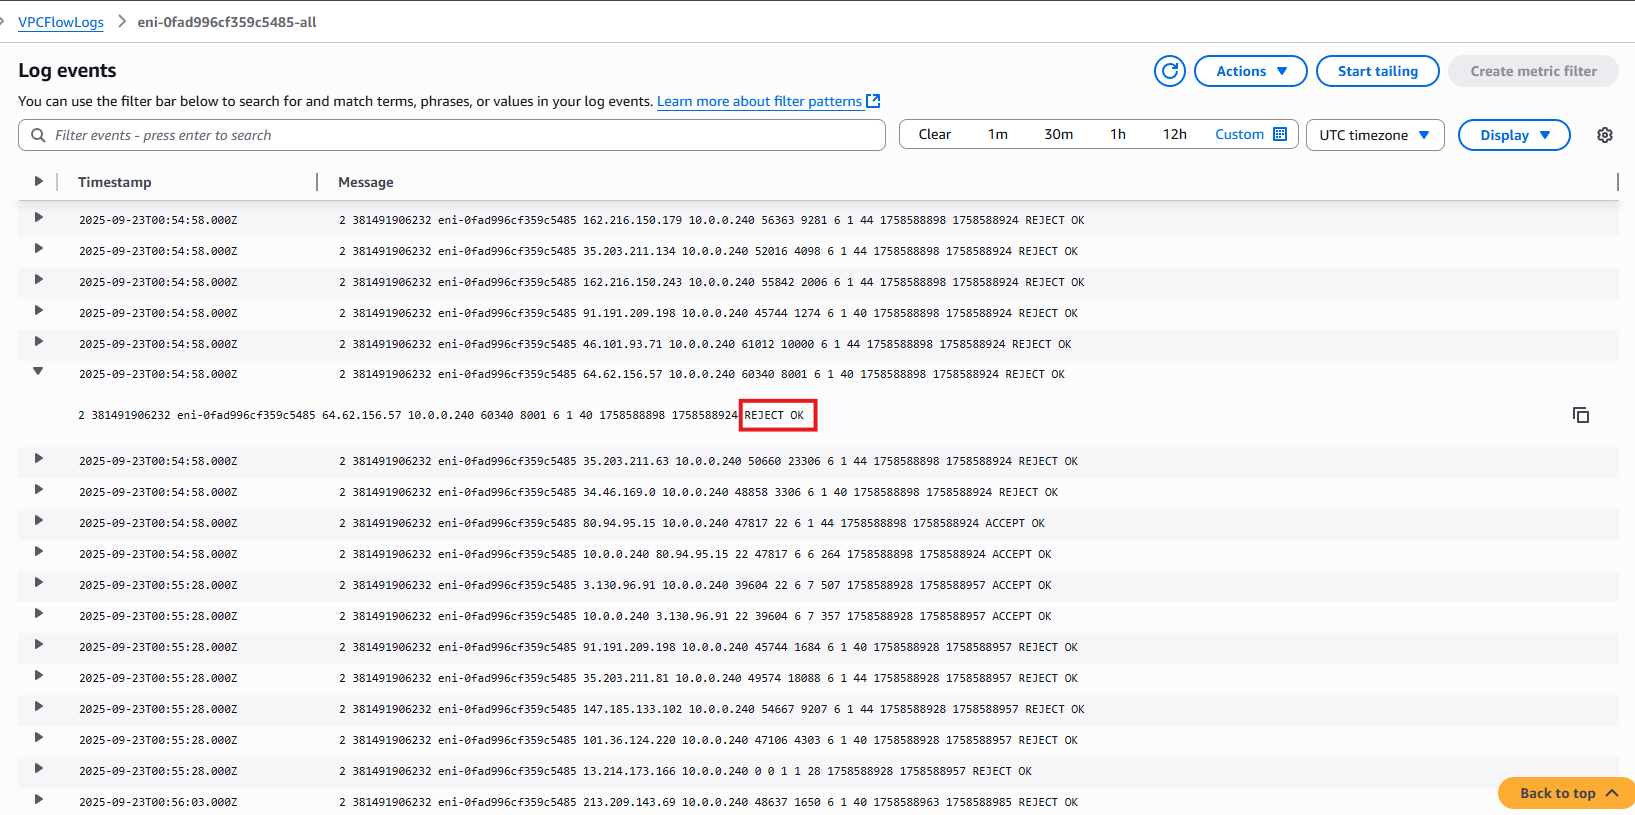
Logs show rejected requests, which are usually random attack attempts.
Step 4: Analyze Flow Logs with Athena 🧐
Athena allows you to run SQL queries on your VPC Flow Logs stored in S3. This helps analyze network traffic, detect security events, and generate insights.
Step 4.1: Configure Athena Query Result Location
- Navigate to Athena → Settings → Manage Settings
- Set Query result location to an S3 bucket (e.g.,
demo-athena-elis-v1/athena) - This is where Athena will store query results.
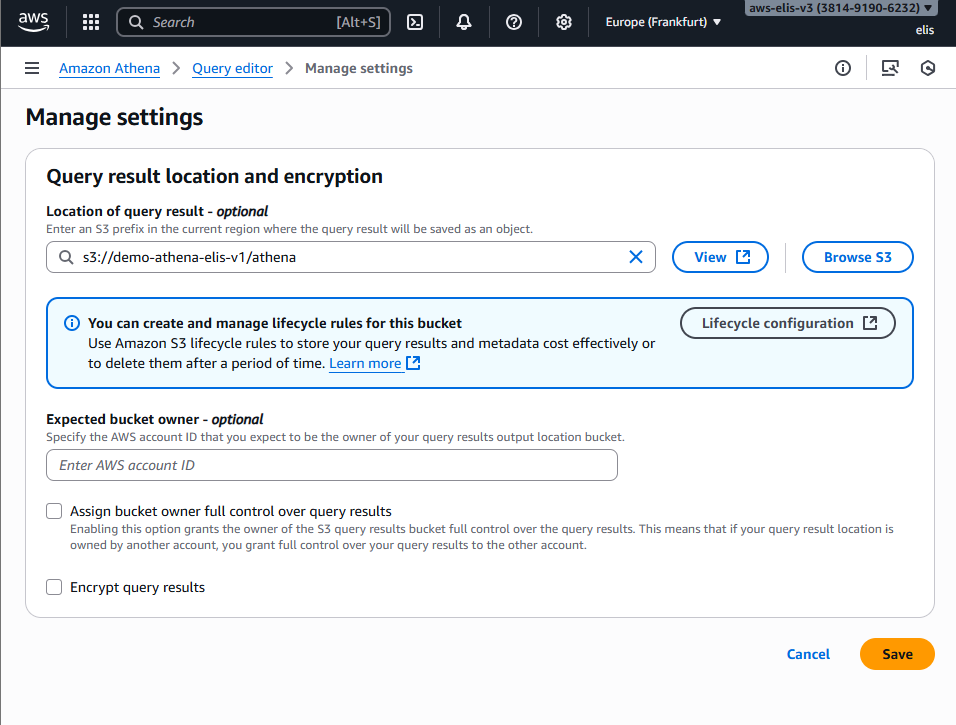
Make sure the bucket exists and you have write permissions.
Step 4.2: Create a Table for VPC Flow Logs
- Copy the DDL statement from AWS documentation: https://docs.aws.amazon.com/athena/latest/ug/vpc-flow-logs-create-table-statement.html
1
2
3
4
5
6
7
8
9
10
11
12
13
14
15
16
17
18
19
20
CREATE EXTERNAL TABLE IF NOT EXISTS vpc_flow_logs (
version int,
account_id string,
interface_id string,
srcaddr string,
dstaddr string,
srcport int,
dstport int,
protocol int,
packets bigint,
bytes bigint,
start bigint,
end bigint,
action string,
log_status string
)
PARTITIONED BY (date string)
ROW FORMAT DELIMITED
FIELDS TERMINATED BY ' '
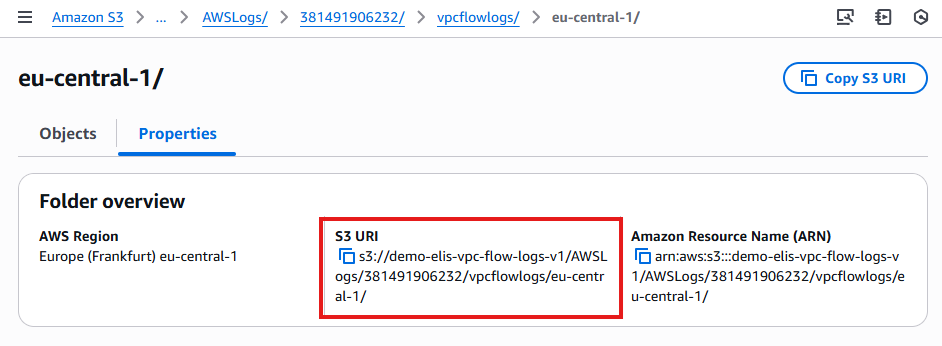
LOCATION 's3://<your-flowlogs-bucket>/AWSLogs/<account-id>/vpcflowlogs/<region>/';
- Replace your-flowlogs-bucket, account-id, and region with your actual values.
- This creates a table linked to your S3 Flow Logs.

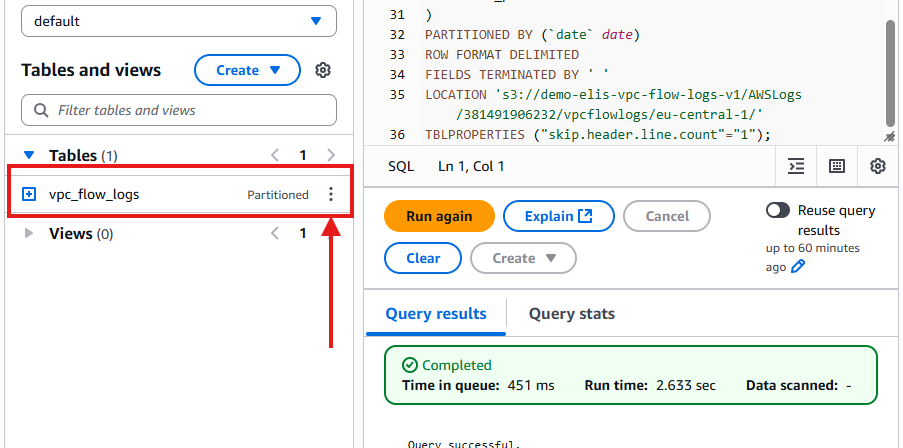
- Then we click hit run and see that our table has been created:
Step 4.3: Add Partitions 🗂️
- Athena requires partitions to read daily logs efficiently.
- Use the following
ALTER TABLEstatement:
1
2
3
ALTER TABLE vpc_flow_logs
ADD PARTITION (`date`='YYYY-MM-dd')
LOCATION 's3://<your-flowlogs-bucket>/AWSLogs/<account-id>/vpcflowlogs/<region>/YYYY/MM/dd';
- Replace YYYY-MM-dd and the S3 URI with your current date and bucket path.
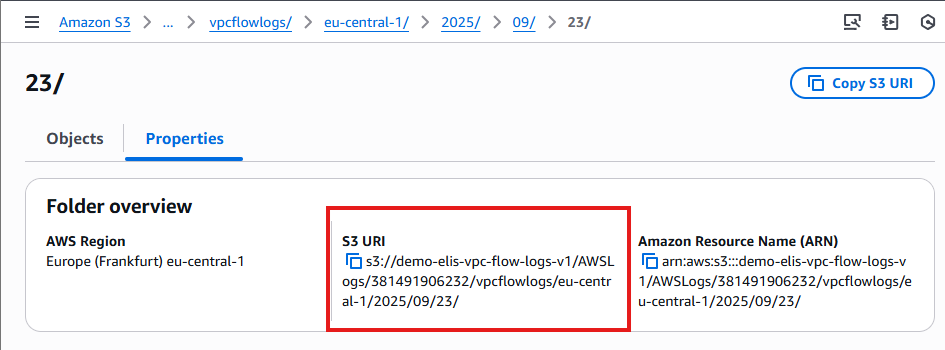
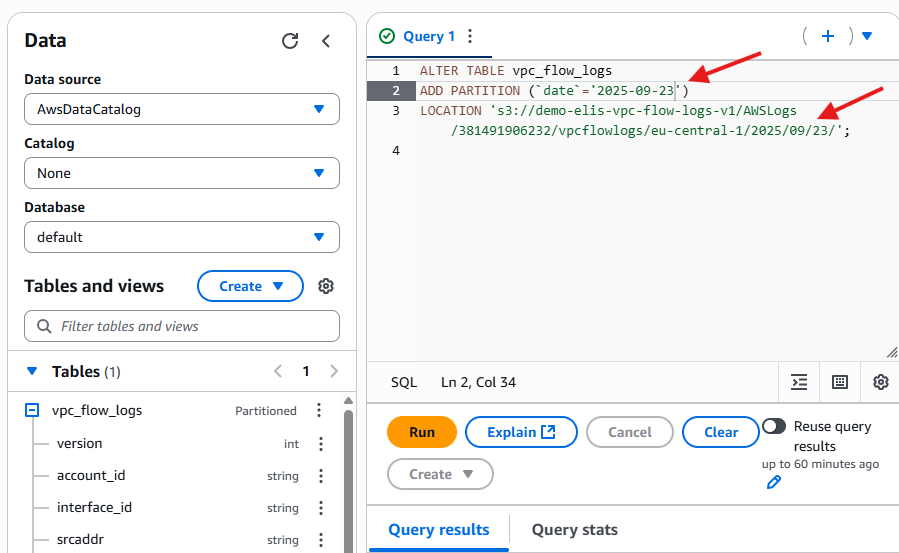
- After running this, Athena can query the Flow Logs for the specified date.
Step 4.4: Run Sample Queries 🔍
1
2
3
4
5
6
7
8
9
SELECT day_of_week(date) AS day,
       date,
       interface_id,
       srcaddr,
       action,
       protocol
FROM vpc_flow_logs
WHERE action = 'REJECT' AND protocol = 6
LIMIT 100;
- Execute this query in Athena Query Editor.
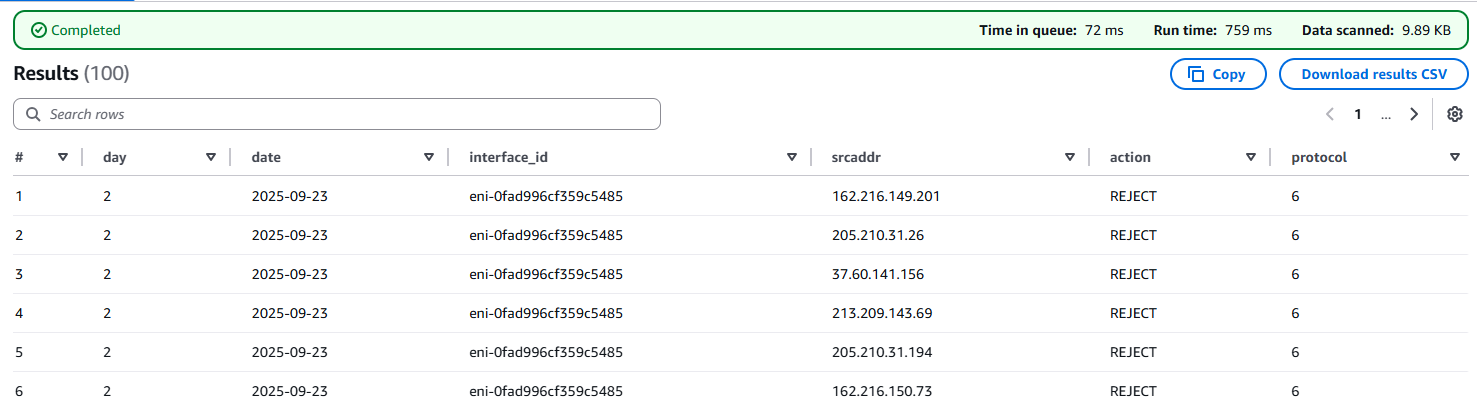
Results include:
day – Day of the week
date – Log date
interface_id – ENI associated with instance
srcaddr – Source IP address
action – ACCEPT or REJECT
protocol – Protocol number (6 = TCP)
Step 4.5: Next Steps with Athena 🚀
Create more complex queries, for example:
Group by source IP to identify frequent attackers
Count REJECT vs ACCEPT actions
Analyze traffic patterns over time
Athena allows deep insights into your network security, helping you monitor and troubleshoot your AWS VPC environment efficiently.
14. VPN Connections (Overview) 🔒
Setting up a VPN allows secure communication between your on-premises network and AWS VPC.
For this project, we will only outline the steps and show screenshots; no live connection is created.
14.1 Create Virtual Private Gateway
- Navigate to VPC → Virtual Private Gateways → Create Virtual Private Gateway.
- Name it:
DemoVPGW. - Attach it to your VPC:
DemoVPC.
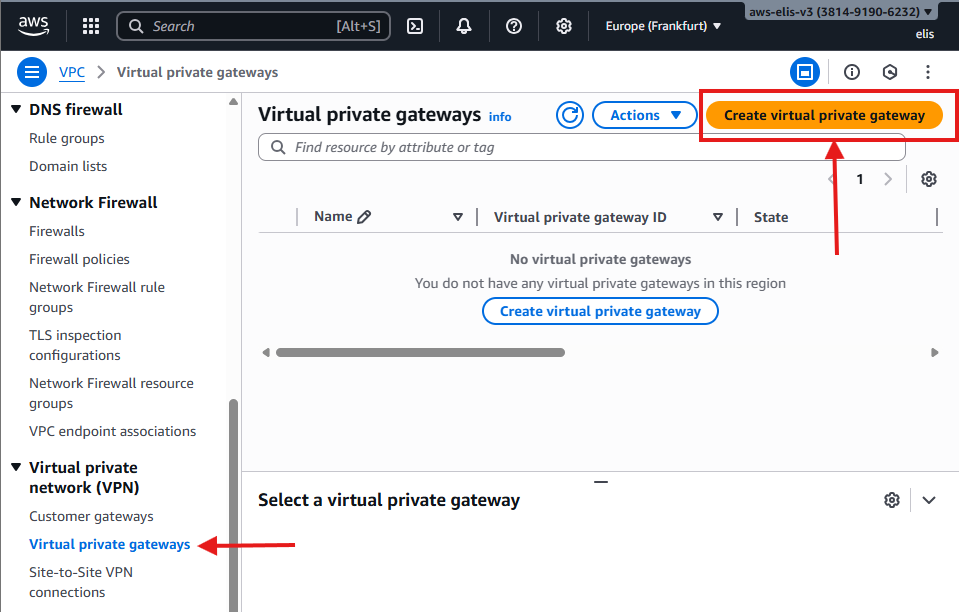
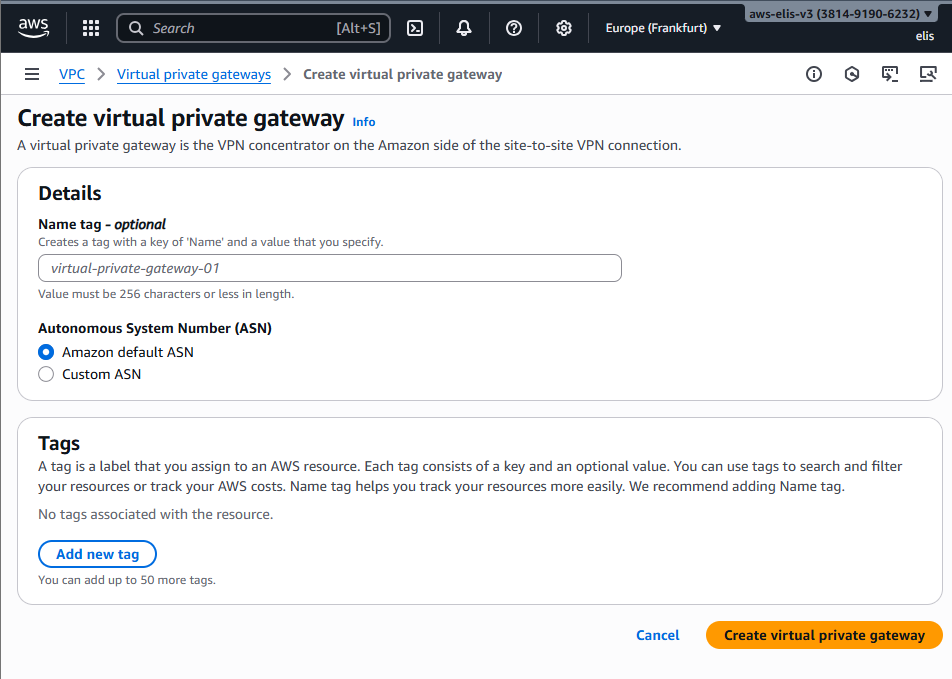
The Virtual Private Gateway is now ready to handle VPN connections.
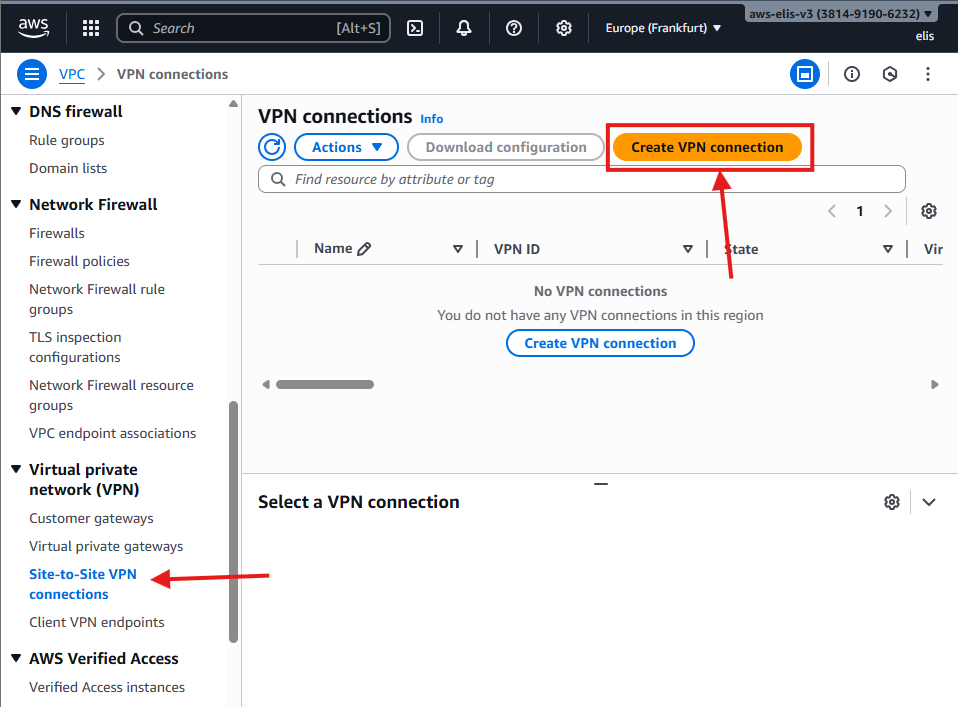
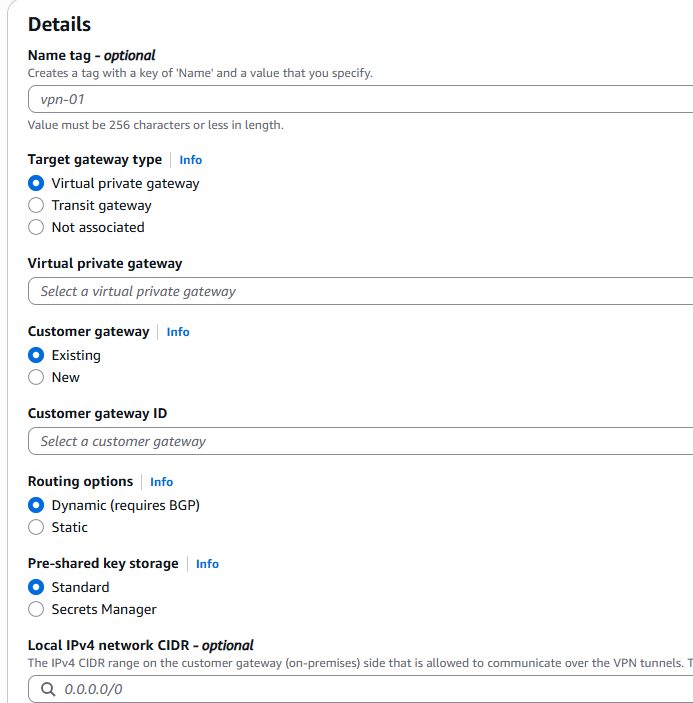
14.2 Site-to-Site VPN Connection
- Navigate to VPC → VPN Connections → Create VPN Connection.
- Settings:
- Virtual Private Gateway:
DemoVPGW - Customer Gateway:
<Your Customer Gateway> - Routing Options: Static or Dynamic
- Virtual Private Gateway:
- Click Create VPN Connection.
Note: AWS Direct Connect, Transit Gateway, and Egress-Only Internet Gateway, for IPv6 are additional options for advanced connectivity.
🎉 Congratulations! 🎉
You have successfully built a full AWS VPC with:
- Public and Private Subnets
- NAT Gateway
- Bastion Host
- Security Groups & NACLs
- VPC Peering
- VPC Endpoints
- Flow Logs & Athena Queries
- VPN (Overview)
Your environment is now fully operational and ready for further scaling, monitoring, and security enhancements.
Future Projects 🚀
Planned projects after SAA-C03 certification:
- Build a To-Do List website
- Explore Transit Gateway multi-VPC setups
- Experiment with Direct Connect for private links
- Create more Athena queries for Flow Logs analysis